Archive | Parties & Holidays RSS feed for this section
22 Oct

Halloween Bentos

Can you believe that Halloween is almost here?

Where did this year go!?

If you’re a lunch-packer in need of some spooky lunch inspiration, I’ve got you covered.

Most of these lunches don’t require anything more than inexpensive cookie cutters, stickers, and a few Halloween-themed treats easily found at your local grocery store, but you certainly don’t even have to go that route.

All you really need is a little creativity. Just use your imagination and maybe some things found around your house to create your own creepy lunches for your little creepers!

Here (in no particular order) are my ten favorite Halloween bentos to get ya thinkin’!

Halloween Lunch Ideas for Kids

  1. This ridiculous lunch that I made for the Mr. that turned out to be a huge hit at work. Go figure!
  2. Bat and blood snack box. Pomegranate arils make great edible blood drops… just sayin’.
  3. Exuberant Pumpkin Bento! I still say they look more like bell peppers.
  4. A Vampire-themed bento is a must!
  5. Skeletal Bento. Super cool and only slightly spooky!
  6. This Bat-tastic Bento complete with peeled grape eyeballs, bat sandwiches, bat carrots, bat pretzels and even a chocolate bat! Give me a theme and I’ll run with it! 😉
  7. Witchy Bento with homemade tortilla cats, a cheesy broom and guacamole potion!
  8. Creepy Crawly Buggy Bento. Ew!
  9. Monster Mash Bento. I still love how this one turned out. I mean, Gummy toes. Come on.
  10. Last but not least, one of my personal favorites, Last Year’s Halloween lunch.

And if you’re in the mood to make your own Halloween food picks, I’ve got you covered there too. It’s easy, promise!

Halloween bento picks

2 Dec

On the way home from pre-k every afternoon, I would ask Camryn how her day was.

She’d tell me what they did, who she played with, what they had for snack. The usual stuff.

Then one day she told me that she had been partnered with a girl named Mady and that Mady thought she was a princess.

So I asked her what was wrong with that and I’ll never forget what she said to me next: “I don’t care for princesses.”

And she never has. My daughter isn’t into fairies, dolls, princesses, Barbies, or most of the other gender specific toys marketed to girls.

When she was younger, any time we’d go into a toy store, she always headed for the dinosaurs and electronics.

cam & t-rex.52

My baby and her pal, “Mr. T”

In fact, the only female character she ever really identified with was Tinkerbell who is basically an engineer.

And (you may want to sit for this one) she’s only seen Frozen once.

Gasp!

I know.

It was on the Disney Channel one night and when I asked if she wanted to watch it again, her response was “I’ve already seen it so I’m good.”

However, if How It’s Made is on, I guarantee she’s standing in front of the television giving that program her full attention.

In all fairness she does have a huge Barbie Dream House but I think she was more interested in the construction of the house than the actual playing with Barbies in it.

So any time I shop for gifts for her, I’m always disappointed in the lack of STEM (Science Technology Engineering and Math) toys that are actually geared toward girls.

Then I thought, I can’t be the only parent of a little girl who is more interested in the engineering and construction of a house rather than actually playing house.

So this year, I’ve put together a list of toys, games, books, and other items that would make great gifts for any girl whether she’s a sparkly pink princess in training or an aspiring rocket scientist.

I’ve included links to the manufacturer’s websites in some cases so that you can learn more about the product but almost all of these items can be found on amazon.com.

Happy Shopping!

Science

The Young Scientist Club – Science kits and games for kids 3-12. Lots to choose from.

Thames and Kosmos Science Kits – Tons of cool stuff to choose from here. I’ll bet their candy chemistry kit is pretty popular.

ScienceWiz – Activity kits for every scientific interest.

Be Amazing Science Kits – The Big Bag of Science or any of the Test Tube Discoveries kits would make a great gift.

Smartlab Toys – These are just cool. Especially this one.

Minimuseum Pocket Sized Collections of Rare Specimens – Okay, this one is pretty expensive but I think that any girl who was interested in fossils or specimens would be super excited to receive this.

Microscope & Slides – This one’s a no-brainer for a young scientist.

Baking Sets – Bet you didn’t see this one coming. Since baking requires precise math that includes addition, subtraction, fractions and time followed by a series of chemical reactions, a baking set fits perfectly in this category.

Technology & Engineering

Lego Friends – If your little lady loves to build but also loves all things girlie, this is the set for her. Cam has a few of these sets and plays with them often.

Lego Creator – My husband has already put in a request for the Mountain Hut so that he and Cam can put it together in their blanket fort.

Lego Minecraft – I’m not super involved in the whole Minecraft situation going on in my house right now but from what I understand from Camryn, it involves construction, chemistry, and problem solving so I can see why she loves it.

Zoob Challenge Moving Mind Building Modeling System – With this system kids can design their own creations or follow the instructions and build contraptions to solve 26 challenges like making a ball bounce into a target.

Goldie Blox – Story and construction sets geared specifically toward girls! I love this concept. Kids read the story and follow the included instructions to construct some pretty cool contraptions.

Roominate – I wasn’t too impressed with these until I watched one of the videos. Then I understood the appeal. Not only can kids build a customizable dollhouse out of the modular pieces, but they can also wire windmills, carousels, elevators, lamps, and so many other things. Pretty cool. It’s also got some pretty great reviews on amazon.com.

Learning Resources Candy Construction – Because it’s cute.

K’NEX Amazin’ 8 Coaster Building Set – Use 448 pieces to build your own motorized roller coaster. How cool!

SmartLab Toys Weird and Wacky Contraption Lab – This reminds me of that game, Mouse Trap (which would also be a good addition to this list). The 60 parts can be mixed and matched to create an unlimited number of contraptions. This way kiddos won’t get bored too quickly.

4M ProductsA robot you make from a soda can? Neat-o.

Snap Circuits Jr. – Kids can build over 100 electronic projects and no tools are needed because everything just snaps together!

LaQ kits

Connectagons – These are all pretty cool but I especially like this set.

Loctagons

Marble Mazes

Magna Tiles

littleBits

Math

Math Magic – At least 15 math tricks, puzzles and games.

Hot Dots – Interactive math lessons for your child’s grade level.

Inchimals – For ages 3 and up. Teaches simple math and measurement.

Tangrams – Great for kids who like puzzles.

Learning Wrap-Ups – Kids wrap the string from the problem on the left to the answer on the right and then flip it over to see if they got it right. Great for practicing basic math independently. Would make a great stocking stuffer.

Music & Books

They Might Be Giants Here Comes Science cd & animated dvd – This is going in Cam’s stocking!

What Is It? Musical Math & Science

Ballads for the Age of Science

Super Smart Science Series – All of these are on my wish list for Cam.

Bedtime Math – Cam loves to chat me up every night at bedtime so I think this book would be a great way to get some math practice into a convo or two.

Rosie Revere, Engineer – For obvious reasons.

On a Beam of Light: A Story of Albert Einstein – A great read with adorable illustrations.

Any of David A. Adler’s math books for kids – David A. Adler’s children’s math books were a favorite of Cam’s.

Girls Think of Everything: Stories of Ingenious Inventions by Women

Games

BrainBox Card Games – Lots of subjects to choose from including: Math Memory, Science, and Inventions.

Robot Turtles – Teaches programming fundamentals to kids 4 and up.

Professor Noggin’s Trivia Card Games – Lots of great choices that would fall under STEM.

Suspend by Melissa and Doug

Sumoku

Math Noodlers – There is also a version for kids in grades 4-5.

Clothes & Accessories

Because our girls deserve better than this.

More Than Just a Princess T-shirt and Hoodie from Goldieblox – Yes to both!

Graphic Tees from Land’s EndThis one is pretty cute and so is this one.

Cool Science T-shirts

Any of these

Love this one for so many reasons.

Either this shirt or this one, found on Etsy.

Tattly Designy Temporary Tattoos (Science Set) – What kid doesn’t like temporary tattoos? These are so cool that I would even wear them.

Experiences

A day at a local zoo or aquarium would be a great gift.

Or if you can swing it, how about a membership to her local science museum?

25 Oct

Halloween bento picks


I wish I could claim to be the crafty genius who came up with the idea for putting puffy stickers on toothpicks or plastic cocktail picks to create homemade bento picks but honestly, it’s been done so many times that I couldn’t even tell you where it originated from.

I can however show you my favorite way to make bento picks.

I really think you guys are going to love it.

First though, in case there are those of you who aren’t familiar with the puffy sticker/toothpick methods, I’m going to walk you through each one.

I’ll also explain why I don’t like either of them.

Seems like I’m always rebelling against something on this blog. Today it’s puffy stickers, tomorrow – who knows?

There are two ways to make food picks using puffy stickers.

Method 1 : The puffy sticker is hot-glued directly onto the toothpick or plastic cocktail pick. Once dry, it’s ready to use.

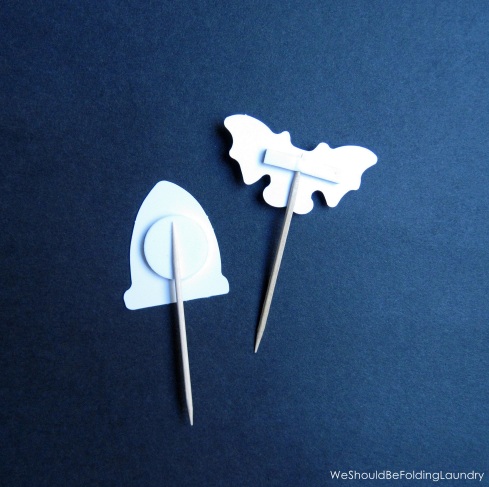
Method 2: Mirror images of stickers (like the set pictured below) are stuck together with the toothpick or plastic cocktail pick in between.


bento picks - Halloween 005


My first issue is with the glue. It can be messy and you have to wait for it to dry.

You also need to press the stickers for a minute or two to keep the bottoms together while the glue sets.

And if you don’t use glue, the bottoms of your stickers will come apart. You can see this happening in the picture at the very top of this post.

It’s not a big deal but as a perfectionist, this really bothers me.

Now let’s talk about my favorite way.


bento picks - Halloween 038


I love to use scrapbooking stickers.

They’re almost always 40%-50% off at my local craft store. I think I paid about $1.60 for those googly-eyed cuties up there.

The reason that I love using scrapbooking stickers for this project is because they all have a piece of sticky foam on the back so I can just run my toothpick right up into that foam and it’s not going anywhere.

See…


bento picks - Halloween 048


Quick and easy.

No waiting for glue guns to warm up or messy glue to dry and then peeling it off of your fingers later.

This takes two seconds and it’s done.

You can also just stick a toothpick onto the back, like I did with the pick on the left, and it will hold just fine.


bento picks - Halloween 052


Pretty cute, right?

I love them.

Camryn has a field trip on Halloween so I’ll be packing some of these cute picks in her lunch that day.

If they don’t make it home, it’s no biggie. They’re disposable anyway.

So if you’re looking for a cheap and easy way to spruce up your kiddos lunches for Halloween, or really any day, I hope you’ll give this method a try.

Remember, these work great as cupcake toppers too!


Camryn’s Birthday

3 May

Cam turned seven last Friday.

Since her besties have all moved away, we decided to have a family celebration at home and then take her to a local bouncy place that she loves.

I asked her what kind of birthday cake/cupcakes she wanted and she said “Hello Kitty” so I took that information and ran with it.

I did the majority of the baking while she was in school Thursday so that Friday, all I had to do was a little dipping, a little decorating, and a little set up.

We set up a little Hello Kitty treats table in her bedroom and when she got home that afternoon, I told her to go change into some shorts so that we could go bounce.

She was so surprised when she walked into her room and saw everything set up. It was a really precious moment.

She saw the table and asked me if it was all for her. Goodness gracious.

Since I used quite a few things from my lunch packing stash to make her day so sweet, I wanted to share some pics with you guys to show you how you can use bento supplies for something other than making lunches.

I also wanted to share some budget friendly party tips that I hope you might find useful.

Here are a few pictures from her special day:


cam's 7th birthday treat table

I’ve done a lot of treat/dessert tables for various parties and I really like having a background of some sort. It ties everything together and provides a great focal point. I once spent days making a huge paper floral backdrop for a party but that’s a story for a different day. It’s not work if you love it, right?

Hello Kitty paper background: I found some HK coloring paper rolls at Michael’s (local craft store) for $1 a piece and immediately thought that they would make a perfect backdrop. Incidentally, I found HK coloring paper rolls at Super Target next door that were twice the size so if you’re looking for this paper, check Target and your local craft stores.

I’ve also used this paper to line tables at a party so that party guests could color if they wanted to. You’d be surprised by how many adults actually end up coloring.

Hello Kitty garland: This is just HK themed scrapbook paper that I bought at Michael’s. I cut triangles, punched holes in each corner and strung a ribbon through to hang it. Scrapbook paper is very inexpensive and can be used in countless ways. In fact, I don’t think I’ve ever thrown a party without it.

Red tissue puff decoration: I’m sure you’ve seen these everywhere. This is just 8 small sheets of tissue paper folded accordion style, paper clipped in the middle to keep together, and then fluffed up by gently separating each layer. I can usually get a pack of 12 sheets of tissue paper pretty much anywhere for .99 or less.

Red table cover – A set of two plastic table covers that I purchased at Super Target for less than $2. The cheap table covers tend to be thin so I like to double up whenever I can.

Framed Hello Kitty pictures – I found the frames at Michael’s for $2 a piece. The pink starry background is scrapbook paper that I already had in my stash that I cut to fit inside the frames. The HK graphic is just a set of stickers that I also found at Michael’s. This project cost me about $11 to make but that was only because I could not get my mobile coupons to work. I ALWAYS use a coupon when I shop at Michael’s because it regularly saves me 30%-40%.

Hello Kitty figurine: This is Cam’s piggy bank. It normally lives on the shelf of her headboard but I re-purposed it for her party.

Hello Kitty, Keroppi, Chococat, and My Melody decorations: These are cake toppers that I purchased here. These have been featured in a few of Cam’s lunches.

Pink and white striped boxes: These served two purposes: They acted as risers for some of the food plates and they hid Cam’s presents! All of her presents fit into those cute pink striped boxes. I purchased them at Target for $2.99 a piece, stuck a few HK stickers from the same pack that the framed stickers were in on the side and called it done. The best part, is that I can use these boxes over and over.


cam's 7th birthday

Let’s talk about what’s on that table.

The Glass bottles are Starbucks Frappuccinos that we drank over the course of the week, ran through the dishwasher, and soaked in vinegar to get the sticker residue off. When they were dry, my husband rimmed each one with a Hello Kitty sticker, added a little strawberry juice to the bottom of each bottle, and then topped them off with lemon/lime soda.

I bought the silly straws at Michael’s for $1.50.

I love the way these bottles look on a party table. They would be adorable rimmed with rainbow sprinkles and filled with strawberry milk. These were supposed to be rimmed with Pop Rocks but my husband forgot them when he ran out for a couple of last-minute things that day. :/

During Cam’s party, we dropped big chunks of cotton candy into our sodas. This is really neat to watch. The soda bubbles up and the cotton candy instantly disintegrates. This would have been made much more fun with the addition of Pop Rocks. Maybe next year.

The four small red and pink candies at the front of the table are vanilla Oreo truffles that I molded using some of Camryn’s Moon Sand molds and covered in red or pink candy melts. I washed the molds in the dishwasher before I used them.

In the glass jars off to the right side of the table are strawberry Pocky, Hello Kitty cotton candy (yes, there is a HK brand of cotton candy!) which I found at Wal-Mart, and strawberry malted milk balls. She had so hoped the Easter Bunny would bring her some of those last week but he (ahem… she) couldn’t find any.


cam's 7th birthday

I think now is a good time to tell you that my kids normally don’t eat a lot of sugary foods but on their birthdays, they’re allowed to go nuts.

Now let’s move on because we need to discuss those cones. Their cuteness is still killing me. They were also really easy to make.

These are normally made with cake balls but I personally don’t care for cake balls. They just don’t do anything for me (probably a texture issue) so these babies were made with donut holes. Yep. Store-bought donut holes which made the process so much easier and they fit the mini cones perfectly.

I put a few mini m&m’s in the bottom of each cone. Then I dipped the bottom of each donut hole in some pink candy melts and set it in the cone, pressing down a little to ensure a good seal. When the candy is dry, it seals the donut hole to the cone so you can dip the entire thing in the candy melts, let the excess drip off, and let dry. I melted a little chocolate for the drizzle on top, and used a spoon to guide the melted chocolate down onto the cone to give the appearance of dripping chocolate. Then I added a few sprinkles and a red mini m&m before it dried.

These were by far the cutest food item at the party. Yummy too!

Next up…marshmallows.

Sparkly marshmallows couldn’t be easier to make. If you like peeps, these will be right up your alley. To make them, just insert a toothpick or super cute food pick of some sort (preferably one that matches your theme) into the marshmallow, dip quickly in clean water, and then roll in sparkly sanding sugar. That’s it. I like to set mine on wax paper until they’re dry.

To make the red-bottomed marshmallows, which photographed hot pink instead of red because her room is dark and my camera is old, just dip marshmallow bottoms into melted red candy melts, allow excess to drip off, add sprinkles if you want them, and set on wax paper to dry.

To make dipping easier, I ALWAYS add a little Crisco or veg oil to my candy melts. If you don’t there’s a good chance it will seize up on you and you won’t get a smooth, shiny finish. I only use Crisco for fondant work and candy melts but if that grosses you out, you can use coconut oil.

Just add a couple of tablespoons of your oil of choice per bag of candy melts, pop it in the microwave for 30 seconds, stir, pop back in for 30 seconds, stir. Repeat until smooth and melty and dip until your heart’s content.

Insert lollipop sticks before dipping if you want to serve them on sticks which is always super cute and fun for little ones.


cam's 7th birthday

I just loved these white sparkly marshmallows with the red HK bow picks.

cam's 7th birthday

Pictured above are slices of pound cake that I cut with a flower shaped cookie cutter and covered in melted canned frosting.

Let’s pause here because I can hear some of you gasping.

Yes, I am normally a from scratch kind of baker. But it is much easier and often cheaper to buy the canned stuff, zap it in the microwave until pourable, and then use it to cover baked goods with a satiny smooth finish. I haven’t been able to accomplish this with homemade frosting.

On top of each piece of cake is a red (yes, red.) marshmallow fondant decoration that I made using my new bento tools. They worked perfectly with the theme. The blue sevens are actually the L from this set turned upside down.
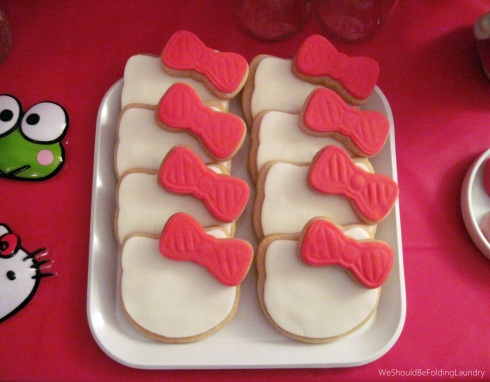
cam's 7th birthday - hello kitty cookies

 I love how cute these cookies turned out. Even though there isn’t a lot of detail, you can still clearly tell who it is. These are just simple sugar cookies that I cut into HK shapes using cookie cutters, spread with a little vanilla frosting, and topped with marshmallow fondant that I cut and stamped using the bow from this set.


hello kitty & friends cupcakes


For her birthday, Camryn had strawberry cupcakes with vanilla buttercream. We girls like Hello Kitty’s friends just as much as Hello Kitty so I made sure to include them too. HK’s friends were all made very late at night by me out of marshmallow fondant. I bought the Hello Kitty cupcake toppers from my favorite online bento supply store.


Camryn's new bento

Camryn was so delighted to find the new Cutezcute Baby Night Owl bento box in one of her gift boxes. She had her little heart set on this bento box for a while so this was a fun surprise. I have to say, this bento box is small but it’s beyond adorable. It’s going to take some planning on my part to get her lunch to fit in there so stay tuned for updates.

At this point my camera had died and I was snapping away with my phone so I apologize for the blurry picture.

After a few treats and presents, we headed out to the bouncy place. There was no one there when we arrived so for a while, Cam had the whole place to herself.


She was in absolute bouncy heaven until about 6:30 that evening when she came running over to me crying about not feeling well. We had planned to go out to dinner after bouncing but when her fever spiked and the full wrath of the impending bout of strep/scarlett fever hit, we knew we would be in for the night.

And that’s how it all ended. It wasn’t pretty but she had a brand new Kindle Fire tablet with a neato squishy pink cover to keep her mind off of how bad she felt.

Even though her day didn’t go quite how we planned, I’m just thankful that she was able to enjoy most of it.

2 Feb

So I guess teams are playing sports or something right now and it’s a pretty big deal?

Normally I have no idea what’s going on but I really can’t feign ignorance this time. My husband is from Colorado and he loves his Broncos so this year’s Superbowl is a major event around here.

Personally, I could care less about sports in general. I don’t know anything about the rules or who plays for what team and the few times that I somehow found myself in a stadium while a major sporting event of some sort was going on, I can pretty much guarantee that my sole focus was on food and not whatever was going on down on the field.

Sports are boring but I can always eat.

On any given day some team is playing something. And you can bet that my husband is watching it. Any sport, it doesn’t matter. He’s into it.
And he especially loves when I say something super intelligent like ‘Wow, South Dakota really brought their A-game!’

Don’t worry, I’m fully aware that it’s San Diego that we’re watching but I do love to mess with my husband while he’s got our television tied up all day.

Marriage. 😉

So because his favorite team is playing in the Superbowl right now and I’ve annoyed him during pretty much every game this season, I thought reparations were in order.

Since it’s just us, I didn’t want to go overboard. I just made a few little treats for us to enjoy during the game.

And, I’m even going to sit with him and watch most parts of it too!

Mostly because that’s where the food is. And also the vodka.

Speaking of food, here’s what we’ll be munching on…


Crush Cakes

I mixed a box of vanilla cake mix with 12 oz. of orange Crush and the zest of an orange. After the cupcakes were baked in mini-muffin tins and frosted with vanilla frosting, I just topped each one with an orange or blue m&m.

I thought that calling these mini cupcakes “Crush Cakes” was genius because there was orange Crush in them but also because the Broncos are going to crush the Hawks. Get it? So clever.

But then the hubby told me that at some point, many years ago, the Broncos were called The Orange Crush or something (I was only half listening as usual) and I felt like a genius.

Sea Hawk Wings

Just regular chicken wings that I sprayed with a little canola oil, sprinkled salt and pepper onto and then baked at 425 for 25 minutes. Then I turned on the broiler, basted them with a mix of hot sauce, powdered garlic, and a little honey, stuck them under the broiler for 2-3 minutes, flipped them, basted the other side with the sauce and broiled for another 2-3 minutes.

Orange and Blue Krispies Treats

These are just Rice Krispies treats that I sprinkled orange and blue mini m&m’s and orange sprinkles on top of. Easy peasy. Except for that part where I had to pick out a whole bunch of orange sprinkles from a Halloween canister of black and orange sprinkles. That part I could have done without.

Orange and Blue Chips and Queso

Sweet potato and blue corn potato chips served along some spicy queso.
Pizza

Mostly for the kids because Mama likes her wings spicy. And pizza is sort of orange so it works. I didn’t include a picture because I think we all know what cheese pizza looks like. 😉

Orange Cream Floats

Oh. My. Word.

These are so yummy and are sure to make football watching much more tolerable. I just added 2-3 scoops of good vanilla ice cream to a glass and poured over a shot (or two) of whipped cream flavored vodka. Then I filled the glass with orange soda and plopped in a straw.

I can also attest to the fact that these are equally delicious as root beer floats.

So that’s what’s going on at my house. What’s happening at yours? Did you make any Superbowl treats?


4 Nov

Halloween Collage

Happy Monday!

How was your Halloween?

I hope it was full of lots of treats.

We had a very low-key situation at my house. I made a few little things just for us to enjoy.

I made popcorn balls for the first time and I figured why not go all out?

Go big or go home right?

Unless you’re already home and then, well… never mind.

I added white chocolate and mini m&m’s to them. Big hit. Big.

You should totally do that.

I also made Rice Krispies Treats and added Reese’s Pieces.

Holy yum.

That’s a game changer folks.

I’ll never make plain Krispies Treats again.

Unfortunately Cam was so sick that she couldn’t get off the couch for most of the evening. Once her Advil kicked in and brought her fever down below nuclear she was able to get her costume on but the poor thing never did eat or drink anything that I made.

Thank goodness for teenage boys. They never stop eating.

We only had two trick or treaters this year.

TWO.

I think we had about 1,173 of them last year.

And each of them wanted a piece to take home to their brother or sister or cousin or whoever so we blew through the candy in no time.

This year we had quite a bit left.

I’m assuming you probably have some lying around your house too.

You could totally just eat it as is (I’m a big fan of that method of candy disposal) or you could bake it in a cupcake!

candy cupcakes

I was going to post each of these cupcakes separately.

Then I realized that there was no reason to keep you guys in suspense like that.

That’s just rude.

So the plan was to get this post up the day before Halloween.

Then the little one came down with a raging case of strep and all bets were off.

She’s finally feeling better thanks to several doses of antibiotics and mostly back to her normal self. So I finally had time to finish up this post and get it out on the internets for you.

I just want to mention before we get into stuffing leftover Halloween candy inside of cupcakes, that you could totally apply this idea to cookies, brownies, regular sized cakes, Rice Krispies Treats, pies, homemade ice cream, popcorn balls, pretty much anything.

I’ve stuffed a lot of different kinds of candy (and cookies) into cupcake batter over the years and I can tell you that pretty much any candy (except for hard candy) works.

You can leave the candy whole or chop it up and fold it into your batter.

Fun-sized candy bars, caramels, Nerds, Pop-Rocks, Peanut Butter Cups, York Peppermint Patties, Reese’s Pieces, truffles, mini M&M’s, chocolate covered cherries, Hershey Kisses.

Been there. Done that.

And if I couldn’t stuff the candy inside of the cupcakes, I probably used it in the frosting or as decoration.

Candy that is flat and round, like Reese’s Peanut Butter Cups and York Peppermint Patties work extremely well inside of a cupcake. Their shape ensures that you get candy in every bite!

A perfect example of this are the chocolate mint cupcakes I made for my Son’s 15th birthday.

What you see up there might look like an average, run of the mill cupcake. But looks can be very deceiving. I wish I had a picture to share with you of the inside of this cupcake because if I did, you would see a York Peppermint Pattie baked inside. The cake is chocolate with mint extract added, mint buttercream, and a Junior Mint on top.

My son loves the chocolate/mint combo so to him, this cupcake was perfection.

Alas, another cupcake that I don’t have an inside picture of to show you.

I can promise you that there is a big ‘ol Reese’s Peanut Butter Cup baked inside of it though.

I can also promise you that it was delicious.

This one was chocolate cake (with the peanut butter cup baked inside), peanut butter buttercream, and a mini peanut butter cup on top.

I think I made this one for a random Sunday a few years ago.

That’s more like it!

This cupcake has a chocolate truffle baked inside of vanilla cake. It was topped with chocolate buttercream, and drizzled with chocolate ganache.

You could just as easily add those tiny candy bars and get the same result.

This cupcake was a huge hit at my house.

Notice my official cupcake taster in the background anxiously waiting for me to hurry up and take the picture so she can eat it.

She loves her job. 😉

This was dulce de leche baked inside of a vanilla cake with dulce de leche buttercream on top.

I used dulce de leche straight from the can but you can also use regular caramels if you prefer. Those work just as well. I just like the creaminess and the deeper caramel flavor that you get from the canned stuff.

Wondering exactly how I made all of these yummy cupcakes?

Well get ready because I’m going to tell you.

Okay, now pay attention because here’s where it gets tricky.

Ready?

I filled my cupcake liners about halfway up with cake batter, then I laid the candy on top, and covered it with the rest of the cake batter.

That’s pretty much it.

Small candies like mini M&M’s, Pop-Rocks, and Nerds get mixed into the batter at the last-minute and then spooned into the cupcake liners.

For the dulce de leche cupcakes, I filled the cupcake liners about half of the way full with the batter, added a spoonful of the creamy caramel goodness, and then covered with more batter.

Ironically, the actual cake recipe doesn’t matter too much here. So just use one that you like. Boxed mixes work just as well as those made from scratch.

Just be sure to keep the cake flavor fairly neutral so that it doesn’t compete with the candy. Chocolate, vanilla, yellow cake, and strawberry are all good cake flavors to use.

I usually stick with a simple buttercream recipe and then jazz it up a bit with extracts, peanut butter, Laffy Taffy, caramel or dulce de leche – pretty much whatever I’m feeling at the time.

To make my favorite simple buttercream:

Cream two sticks of room temperature butter using a stand or hand mixer.

You really want the butter to be light and fluffy so beat the heck out of it for at least 2-3 minutes.

Add 4 cups of sifted powdered sugar and two tablespoons of heavy cream. Yes, you can add milk but I really like the final texture you get as a result of using heavy cream.

Continue whipping the buttercream until it is light and fluffy.

Add a teaspoon of your favorite extract, any food coloring, and a teeny tiny pinch of salt if you used unsalted butter. Whip until completely incorporated.

If the buttercream seems to wet, add powdered sugar, a tablespoon at a time, and whip until it is the consistency you want. If it is too dry, add milk or cream, a teaspoon at a time, and whip until it is the consistency you want.

Once the cupcakes are frosted, I like to add a little candy to the top of each cupcake. Just to give a little hint as to what might be inside.

No Tricks. Just Treats.

29 Oct

halloween treat bucket

My kids don’t trick or treat.

They prefer to do Halloween at home.

No need to feel bad for them though. They get more than enough sweets and treats.

We wear costumes, play games, watch Halloween shows on t.v., and Cam usually hands out candy to the other kids in the neighborhood.

My son lost interest in trick or treating a long time ago. He’s nearly 6 ft tall and over 180 lbs, so people always thought he was a grown man in a mask approaching them for candy. And most people aren’t cool with that.

Then, not too long ago, my daughter figured out that walking around from house to house in the dark asking for candy from strangers just wasn’t all it was cracked up to be and perhaps her brother was on to something.

So every Halloween I make them their own special treat bag or bucket filled with their favorite candy, and some fun little treats. Just so they don’t feel like they missed out on anything.

Last year the kids got cauldrons because I was a witch:

This year they get buckets because I couldn’t find the cauldrons.

I found my buckets in the $1 section of my local Target.

All of the candy came from Walgreen’s.

The Nestle Crunch and 100 Grand bars are all .49 this week at Walgreen’s if you use your Register Rewards card. Those are just taped onto some long lollipop sticks and stuck down into the bucket.

The Reese’s Peanut Butter Pumpkins were .69 each. Those are also taped to lollipop sticks.

I also bought 3 bags of Snickers fun-sized bars for $1.99 each. I used this coupon and paid $3.97 out of pocket for all three bags. I also got $1.50 in Register Rewards back to use towards my next purchase. I used the Snickers bars to fill the bucket and keep the lollipop sticks from sliding around.

The embellishments are just stickers that I found on sale for 50% off yesterday at Michael’s. I attached toothpicks to the backs and stuck them wherever there was a space that needed to be filled.

If anything was too wobbly for me, or was sliding around a little too much, I just added a little tape to the back and attached it to whatever was behind it to stabilize it. The 100 Grand and the Reese’s Pumpkins are both taped in the back to the Crunch bars but you can’t see that from the front.

From the front it just looks like I’m on top of my game.

The hardest part of making these buckets is keeping them hidden from my kids for the next couple of days.

22 Oct

Nerds cupcakes with Laffy Taffy Frosting


Remember when I told you last week that I was going to show you lots of ways to turn your Halloween candy into cupcakes?

It’s happening.

We’re all about to have more candy than we know what to do with.

It’s inevitable.

Why not turn that candy into cupcakes?

Not because any of us needs more sugar, but because it’s just so darn fun.

For these particular cupcakes, we’re using up some Laffy Taffy candies and Nerds because those are two candies that will be in almost every kid’s trick or treat bag.

For the cake part of the cupcake, just use your favorite vanilla cake recipe. You can even use a boxed vanilla cake mix if you want.

Just before you fill your lined muffin cups, fold in a few small boxes of nerds candy, and bake according to your directions.

While the cupcakes cool you can get started on the frosting.


Laffy Taffy Frosting:

Adapted from Bake it in a Cupcake.

12 pieces of fun-sized Laffy Taffy (use one flavor)

2 Tbsp heavy cream

2 sticks of butter

2 cups powdered sugar

food coloring if the color isn’t dark enough for you.


Add the Laffy Taffy and heavy cream to a small sauce pan set over low heat and stir until everything is melted together.

Remove from heat so the mixture can cool a bit.

Using your hand or stand mixer, whip the butter for 3-4 minutes until it is smooth, light in color, and very fluffy.

Slowly add in the powdered sugar a little at a time until it is incorporated into the butter.

Be sure to scrape down the sides of your bowl every now and then.

With the mixer running, very slowly add in the melted and cooled Laffy Taffy and cream mixture and continue mixing until everything is fluffy and completely incorporated.

The frosting should be very pale in color. If you want your frosting to be a little deeper in color, add a few drops of food coloring and mix until the frosting becomes the color that you want.

Pipe or spread the frosting on top of your cupcakes and top with a few Nerds.

If you prefer your frosting to be piled high on each cupcake, just double the recipe.

Top with Pop-Rocks if you aren’t a fan of Nerds.


21 Oct


If there is anything that fills me with more terror than animatronics or wax figures, it’s spiders.

I’m sure they mean well, and they have no interest in bothering me at all but I don’t care.

I try to stay as far away from them as possible.

It’s basically why I got married. I have a round the clock spider killer now.

And the best part, other than the fact that he works for free, is that he doesn’t do that stupid thing that men do after they’ve killed a spider for you where they act like they’re going to throw it on you and then laugh as you shriek in terror and start climbing the walls.

So stupid.

That’s grounds for divorce in my book.

I’m pretty sure that any reasonable judge would understand.

“Yes your honor, that’s correct, he pretended to throw a spider at me and then laughed as I ran screaming out the front door and down the street in front of all of our neighbors.”

And can I just say, reparations for emotional damages wouldn’t be a bad idea either.

My spiders aren’t scary. They’re actually pretty sweet even though they do have a bit of an ick factor.

They’re also easy so they are welcome in my house any day.

To make them, the first thing you need to do is make a bunch of Oreo Truffles.

If you have never had these, put them on your to-do list asap.

They’re so good and you can use any flavor of Oreos.

I will say that I prefer to use chocolate chips or candy melts with a little splash of vegetable oil for dipping rather than the Baker’s chocolate called for in the recipe, but you do whatever your heart desires.

To make the spiders, first make two different sized truffles. You’ll need a smaller sized round truffle for the head, and a larger sized truffle for the body. Just use your hands to shape the body so that it looks like a spider’s body.

But before you shape the body completely, add a Gusher (you know those fruit snacks kids love that have the juicy centers?) to the middle and form the truffle around it. That way when people bite into the spider’s body, they’ll get a disgusting yet tasty surprise.

After you’ve dipped the truffles in chocolate, sprinkle on some black sugar sprinkles (this gives them a gross hairy look) and put them on parchment paper to set up. You need to add the sprinkles while the chocolate is still wet though or they won’t stick.

While the truffles are hardening, cut strips of black licorice. You’ll need 8 legs per spider (obviously).

To assemble, just lay the head and body of the spider onto a frosted cupcake. Then carefully tuck the legs into the frosting under the body.

You can pipe or dab on bright green frosting for the eyes, or you can just attach candy eyes while the chocolate is still wet.


18 Oct

candy corn cupcakes

Here’s the thing…

These cupcakes are another baked treat that was made way before I ever thought about starting a blog.

So… they’re not exactly what I’d call picture perfect.

Obviously, that yellow layer should be a bit larger but I think you get the general idea here.

In fact, this whole concept is so easy that I’m not even going to post a recipe.

You just need white cake batter.

You can use a boxed mix.

You can use a scratch mix.

The mix doesn’t matter here, just the method.

Whatever cake recipe or mix you use, adding 1/2 tsp of almond extract will make your cupcakes taste very similar to candy corn. It’s not necessary but it sure does make them taste yummy.

Once your batter is all mixed up and ready for the oven, pour half of the batter into one bowl and add a few drops of orange food coloring. Add the rest of the batter to another bowl and add a few drops of yellow food coloring.

If you don’t have orange food coloring, just add a couple drops of red and a couple drops of yellow and mix. Repeat the process until you get the shade of orange that works for you.

Mix both batters until each color is well incorporated.

See where I’m going with this?

Now fill your cupcake liners about 1/3 of the way with the yellow batter, and fill another 1/3 of the way with the orange batter.

Bake until the tops spring back when you press them gently and frost with your favorite white frosting once they’ve cooled completely.

To make candy corn flavored whipped cream frosting or any candy flavored whipped cream frosting for that matter: Put a big handful of candy and 3 cups of heavy cream into an air-tight container. Seal it up and leave it in your refrigerator overnight.

When you’re ready to make the frosting, strain the heavy cream and whip it on high until soft peaks form. Then slowly pour in a little sugar and continue mixing until it becomes stiff enough for you to pipe or spread on your cooled cupcakes.

How much sugar?

Good question. It largely depends on the candy you’re using. I usually just add a bit, and then taste, add a bit and then taste, until it’s sweet enough.

The candy corn will make the cream pretty sweet so you shouldn’t need too much sugar.

When it comes to candy flavored frosting, it’s best to stick with one flavor. Like banana Laffy Taffy Frosting and not a mish-mash of different flavored Laffy Taffy.

Things can get weird in flavor town.

Once all of your cupcakes are frosted, place a candy corn on top to drive the concept home.