Archive | Fun Food RSS feed for this section
11 Jan

Kid-Friendly Snacks Made with Bitsy's Brainfood


I’m always on the lookout for wholesome, nutritious snacks for my family.

So when I stumbled upon Bitsy’s Brainfood products while walking through Whole Foods one afternoon, I was intrigued.

Bitsy’s Brainfood Smart Cookies are alphabet-shaped cookies that are made with whole grains and real fruits and vegetables. They contain Omega 3 DHA and they’re a great source of Vitamins A, B6, B12, D3, Folic Acid, calcium, and iron. Bitsy’s cookies are made in a nut-free facility, contain no GMO’s, and every box contains a collectible sticker!

I picked up a box of the Zucchini Gingerbread Carrot Smart Cookies for us to try but I really wasn’t expecting them to go over well. Cookies made with veggies seemed like a hard sell.

To my surprise, my daughter and I really liked them. They were just sweet enough and reminded me a little of Cracklin’ Oat Bran cereal. Just slightly less sweet and with more spice.

I contacted Bitsy’s to let them know how much we had enjoyed their cookies and before I knew it, a large box arrived on my door step.

The box contained Bitsy’s Carrot Raisin Crunch and Fruit & Veggie 1,2,3 cereals as well as more Zucchini Gingerbread Carrot Smart Cookies and a box of Orange Chocolate Beet Smart Cookies.

Cam’s favorite flavor was the Zucchini Gingerbread Carrot Smart Cookies, but I actually preferred the Orange Chocolate Beet Smart Cookies which first taste like sweet orange, then chocolate, and then finish with just a hint of salt. That flavor combo might seem odd but it’s actually really good!

And even though they quite obviously contain beets as indicated by their lovely pink color, I didn’t detect any beet flavor at all!

I packed a few cookies in a couple of Cam’s lunches for a wholesome after-lunch treat. You can read more about these lunches here.


Bitsy's Brainfood Orange Chocolate Beet Smart Cookies


Bitsy's Brainfood Zucchini Gingerbread Carrot Smart Cookies


Next, we tried the cereals which are also made with Whole Grains, Fruits, and Veggies. They contain no GMO’s and they’re Organic, Vegan, and a great source of Vitamins, Whole Grains, Zinc and Iron.

The Carrot Raisin Crunch cereal contains the highest amount of sugar (16 grams) of the three varieties. I’m assuming most of the sweetness comes from the raisins because the cereal itself wasn’t very sweet to any of us at all. It’s very crunchy though and holds up well in milk.

The Fruit & Veggie 1,2,3 cereal is flavored with organic raspberry, orange, lemon, and lime flavors but to us, tasted more like veggies than fruit with a slight aftertaste that reminded me of a children’s chewable multi-vitamin which may have been from the vitamin and mineral premix that it contains. It does smell slightly similar to Fruit Loops and stays much crunchier in milk than Fruit Loops does.

My daughter wasn’t crazy about the cereal on it’s own so we added some to a smoothie bowl that contained additional toppings of her choice and we shared it for snack one afternoon.


Bitsy's Brainfood Cereal Smoothie Bowl


A smoothie bowl is exactly what it sounds like, a smoothie in a bowl topped with your favorite things that you eat with a spoon rather than drink from a glass.

It can be a meal, a snack, or a dessert (depending on the ingredients you use) and it’s much more satisfying than drinking a regular smoothie.

Toppings can be layered on, sprinkled over, or heaped into a pile in the middle. Anything goes.

I usually reduce the amount of liquid I use in my smoothie so that it has the consistency of soft serve ice cream and then add my toppings.

To make a kid-friendly smoothie bowl, I topped Cam’s berry and spinach smoothie with Bitsy’s Brainfood Fruit & Veggie 1,2,3 cereal, sliced bananas, flax seeds, mixed berries, sliced almonds, and a few rainbow sprinkles.

I’ve also created two more kid-friendly recipes using Bitsy’s cereals that I’ll be sharing with you later this week so stay tuned.


Bitsy’s products are available at Whole Foods, Wegman’s, Sprouts, H-E-B, Shop-Rite, and Wild By Nature Market.


Bitsy's Products


You can also purchase Bitsy’s products online at amazon.com, diapers.com, abesmarket.com, freshdirect.com, vine.com, and relayfoods.com

Bitsy’s Brainfood was created by two moms who believe that learning to eat smart can be fun! You can learn more about their story and discover more Bitsy’s Brainfood products here.


Disclosure: The folks at Bitsy’s Brainfood kindly provided me with a few of their products at no charge for the purpose of a review. The opinions expressed in this review are entirely my own. I received no compensation for providing this review.


8 Jul

cuddle palz


If you are a regular reader of this blog, you already know how much I love CuteZCute products. The Animal Friends and the Animal Palz have been featured many times because they’re cute, easy to use, easy to clean, practically indestructible, and most importantly – they’re affordable!

That’s why I’m super excited to be able to share the newest addition to the CuteZCute family with you today, Cuddle Palz!


Cuddle Palz


Cuddle Palz can be used to cut or stamp bread, meats, cheeses, fondant, cookie dough, pie dough, fruits, veggies, fruit leather, tortillas, and so many other things.  You can mix and match the cutters and stamps to create over forty different combinations!

And when you’re done, Cuddle Palz can be washed on the top rack of your dishwasher. Hooray for easy clean up!

There’s so much you can do with this set. I just love it.

I used the koala cutter to make Cam’s lunch today. I showed her the handy dandy combination guide (that can be downloaded and printed out from the Cuddle Palz web page) and let her choose what she wanted. She asked if her koala could be doing a hand stand just like the one pictured and I was happy to oblige because the body cutter makes it so easy.

We used the cute koala pick in her bento today as a food pick but it can also be used to help you remove the small cut-outs from the cutters. We like multitaskers!

Camryn was even able to use our new Cuddle Palz sandwich cutters to make her dad a tiger sandwich. She had a little trouble getting the edges of the bread nice and smooth at first, but once I showed her the “push and wiggle trick” she was good to go and now she’s pretty much a pro. 😉

So if you’re looking for a fun way to spruce up your kids’ lunches in a hurry, I highly recommend Cuddle Palz.

I also think Cuddle Palz would make a great gift as well as a fun party or play date activity for little ones.

Want to learn more about Cuddle Palz? No problem. Just click here.

Want to see Cuddle Palz in action? Here you go.

Cuddle Palz and other CuteZCute products are available on amazon.com and from my favorite bento goodies website, allthingsforsale.com.


Camryn’s Birthday

3 May

Cam turned seven last Friday.

Since her besties have all moved away, we decided to have a family celebration at home and then take her to a local bouncy place that she loves.

I asked her what kind of birthday cake/cupcakes she wanted and she said “Hello Kitty” so I took that information and ran with it.

I did the majority of the baking while she was in school Thursday so that Friday, all I had to do was a little dipping, a little decorating, and a little set up.

We set up a little Hello Kitty treats table in her bedroom and when she got home that afternoon, I told her to go change into some shorts so that we could go bounce.

She was so surprised when she walked into her room and saw everything set up. It was a really precious moment.

She saw the table and asked me if it was all for her. Goodness gracious.

Since I used quite a few things from my lunch packing stash to make her day so sweet, I wanted to share some pics with you guys to show you how you can use bento supplies for something other than making lunches.

I also wanted to share some budget friendly party tips that I hope you might find useful.

Here are a few pictures from her special day:


cam's 7th birthday treat table

I’ve done a lot of treat/dessert tables for various parties and I really like having a background of some sort. It ties everything together and provides a great focal point. I once spent days making a huge paper floral backdrop for a party but that’s a story for a different day. It’s not work if you love it, right?

Hello Kitty paper background: I found some HK coloring paper rolls at Michael’s (local craft store) for $1 a piece and immediately thought that they would make a perfect backdrop. Incidentally, I found HK coloring paper rolls at Super Target next door that were twice the size so if you’re looking for this paper, check Target and your local craft stores.

I’ve also used this paper to line tables at a party so that party guests could color if they wanted to. You’d be surprised by how many adults actually end up coloring.

Hello Kitty garland: This is just HK themed scrapbook paper that I bought at Michael’s. I cut triangles, punched holes in each corner and strung a ribbon through to hang it. Scrapbook paper is very inexpensive and can be used in countless ways. In fact, I don’t think I’ve ever thrown a party without it.

Red tissue puff decoration: I’m sure you’ve seen these everywhere. This is just 8 small sheets of tissue paper folded accordion style, paper clipped in the middle to keep together, and then fluffed up by gently separating each layer. I can usually get a pack of 12 sheets of tissue paper pretty much anywhere for .99 or less.

Red table cover – A set of two plastic table covers that I purchased at Super Target for less than $2. The cheap table covers tend to be thin so I like to double up whenever I can.

Framed Hello Kitty pictures – I found the frames at Michael’s for $2 a piece. The pink starry background is scrapbook paper that I already had in my stash that I cut to fit inside the frames. The HK graphic is just a set of stickers that I also found at Michael’s. This project cost me about $11 to make but that was only because I could not get my mobile coupons to work. I ALWAYS use a coupon when I shop at Michael’s because it regularly saves me 30%-40%.

Hello Kitty figurine: This is Cam’s piggy bank. It normally lives on the shelf of her headboard but I re-purposed it for her party.

Hello Kitty, Keroppi, Chococat, and My Melody decorations: These are cake toppers that I purchased here. These have been featured in a few of Cam’s lunches.

Pink and white striped boxes: These served two purposes: They acted as risers for some of the food plates and they hid Cam’s presents! All of her presents fit into those cute pink striped boxes. I purchased them at Target for $2.99 a piece, stuck a few HK stickers from the same pack that the framed stickers were in on the side and called it done. The best part, is that I can use these boxes over and over.


cam's 7th birthday

Let’s talk about what’s on that table.

The Glass bottles are Starbucks Frappuccinos that we drank over the course of the week, ran through the dishwasher, and soaked in vinegar to get the sticker residue off. When they were dry, my husband rimmed each one with a Hello Kitty sticker, added a little strawberry juice to the bottom of each bottle, and then topped them off with lemon/lime soda.

I bought the silly straws at Michael’s for $1.50.

I love the way these bottles look on a party table. They would be adorable rimmed with rainbow sprinkles and filled with strawberry milk. These were supposed to be rimmed with Pop Rocks but my husband forgot them when he ran out for a couple of last-minute things that day. :/

During Cam’s party, we dropped big chunks of cotton candy into our sodas. This is really neat to watch. The soda bubbles up and the cotton candy instantly disintegrates. This would have been made much more fun with the addition of Pop Rocks. Maybe next year.

The four small red and pink candies at the front of the table are vanilla Oreo truffles that I molded using some of Camryn’s Moon Sand molds and covered in red or pink candy melts. I washed the molds in the dishwasher before I used them.

In the glass jars off to the right side of the table are strawberry Pocky, Hello Kitty cotton candy (yes, there is a HK brand of cotton candy!) which I found at Wal-Mart, and strawberry malted milk balls. She had so hoped the Easter Bunny would bring her some of those last week but he (ahem… she) couldn’t find any.


cam's 7th birthday

I think now is a good time to tell you that my kids normally don’t eat a lot of sugary foods but on their birthdays, they’re allowed to go nuts.

Now let’s move on because we need to discuss those cones. Their cuteness is still killing me. They were also really easy to make.

These are normally made with cake balls but I personally don’t care for cake balls. They just don’t do anything for me (probably a texture issue) so these babies were made with donut holes. Yep. Store-bought donut holes which made the process so much easier and they fit the mini cones perfectly.

I put a few mini m&m’s in the bottom of each cone. Then I dipped the bottom of each donut hole in some pink candy melts and set it in the cone, pressing down a little to ensure a good seal. When the candy is dry, it seals the donut hole to the cone so you can dip the entire thing in the candy melts, let the excess drip off, and let dry. I melted a little chocolate for the drizzle on top, and used a spoon to guide the melted chocolate down onto the cone to give the appearance of dripping chocolate. Then I added a few sprinkles and a red mini m&m before it dried.

These were by far the cutest food item at the party. Yummy too!

Next up…marshmallows.

Sparkly marshmallows couldn’t be easier to make. If you like peeps, these will be right up your alley. To make them, just insert a toothpick or super cute food pick of some sort (preferably one that matches your theme) into the marshmallow, dip quickly in clean water, and then roll in sparkly sanding sugar. That’s it. I like to set mine on wax paper until they’re dry.

To make the red-bottomed marshmallows, which photographed hot pink instead of red because her room is dark and my camera is old, just dip marshmallow bottoms into melted red candy melts, allow excess to drip off, add sprinkles if you want them, and set on wax paper to dry.

To make dipping easier, I ALWAYS add a little Crisco or veg oil to my candy melts. If you don’t there’s a good chance it will seize up on you and you won’t get a smooth, shiny finish. I only use Crisco for fondant work and candy melts but if that grosses you out, you can use coconut oil.

Just add a couple of tablespoons of your oil of choice per bag of candy melts, pop it in the microwave for 30 seconds, stir, pop back in for 30 seconds, stir. Repeat until smooth and melty and dip until your heart’s content.

Insert lollipop sticks before dipping if you want to serve them on sticks which is always super cute and fun for little ones.


cam's 7th birthday

I just loved these white sparkly marshmallows with the red HK bow picks.

cam's 7th birthday

Pictured above are slices of pound cake that I cut with a flower shaped cookie cutter and covered in melted canned frosting.

Let’s pause here because I can hear some of you gasping.

Yes, I am normally a from scratch kind of baker. But it is much easier and often cheaper to buy the canned stuff, zap it in the microwave until pourable, and then use it to cover baked goods with a satiny smooth finish. I haven’t been able to accomplish this with homemade frosting.

On top of each piece of cake is a red (yes, red.) marshmallow fondant decoration that I made using my new bento tools. They worked perfectly with the theme. The blue sevens are actually the L from this set turned upside down.
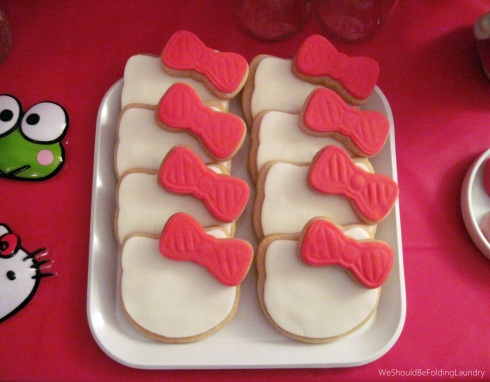
cam's 7th birthday - hello kitty cookies

 I love how cute these cookies turned out. Even though there isn’t a lot of detail, you can still clearly tell who it is. These are just simple sugar cookies that I cut into HK shapes using cookie cutters, spread with a little vanilla frosting, and topped with marshmallow fondant that I cut and stamped using the bow from this set.


hello kitty & friends cupcakes


For her birthday, Camryn had strawberry cupcakes with vanilla buttercream. We girls like Hello Kitty’s friends just as much as Hello Kitty so I made sure to include them too. HK’s friends were all made very late at night by me out of marshmallow fondant. I bought the Hello Kitty cupcake toppers from my favorite online bento supply store.


Camryn's new bento

Camryn was so delighted to find the new Cutezcute Baby Night Owl bento box in one of her gift boxes. She had her little heart set on this bento box for a while so this was a fun surprise. I have to say, this bento box is small but it’s beyond adorable. It’s going to take some planning on my part to get her lunch to fit in there so stay tuned for updates.

At this point my camera had died and I was snapping away with my phone so I apologize for the blurry picture.

After a few treats and presents, we headed out to the bouncy place. There was no one there when we arrived so for a while, Cam had the whole place to herself.


She was in absolute bouncy heaven until about 6:30 that evening when she came running over to me crying about not feeling well. We had planned to go out to dinner after bouncing but when her fever spiked and the full wrath of the impending bout of strep/scarlett fever hit, we knew we would be in for the night.

And that’s how it all ended. It wasn’t pretty but she had a brand new Kindle Fire tablet with a neato squishy pink cover to keep her mind off of how bad she felt.

Even though her day didn’t go quite how we planned, I’m just thankful that she was able to enjoy most of it.

22 Oct

Nerds cupcakes with Laffy Taffy Frosting


Remember when I told you last week that I was going to show you lots of ways to turn your Halloween candy into cupcakes?

It’s happening.

We’re all about to have more candy than we know what to do with.

It’s inevitable.

Why not turn that candy into cupcakes?

Not because any of us needs more sugar, but because it’s just so darn fun.

For these particular cupcakes, we’re using up some Laffy Taffy candies and Nerds because those are two candies that will be in almost every kid’s trick or treat bag.

For the cake part of the cupcake, just use your favorite vanilla cake recipe. You can even use a boxed vanilla cake mix if you want.

Just before you fill your lined muffin cups, fold in a few small boxes of nerds candy, and bake according to your directions.

While the cupcakes cool you can get started on the frosting.


Laffy Taffy Frosting:

Adapted from Bake it in a Cupcake.

12 pieces of fun-sized Laffy Taffy (use one flavor)

2 Tbsp heavy cream

2 sticks of butter

2 cups powdered sugar

food coloring if the color isn’t dark enough for you.


Add the Laffy Taffy and heavy cream to a small sauce pan set over low heat and stir until everything is melted together.

Remove from heat so the mixture can cool a bit.

Using your hand or stand mixer, whip the butter for 3-4 minutes until it is smooth, light in color, and very fluffy.

Slowly add in the powdered sugar a little at a time until it is incorporated into the butter.

Be sure to scrape down the sides of your bowl every now and then.

With the mixer running, very slowly add in the melted and cooled Laffy Taffy and cream mixture and continue mixing until everything is fluffy and completely incorporated.

The frosting should be very pale in color. If you want your frosting to be a little deeper in color, add a few drops of food coloring and mix until the frosting becomes the color that you want.

Pipe or spread the frosting on top of your cupcakes and top with a few Nerds.

If you prefer your frosting to be piled high on each cupcake, just double the recipe.

Top with Pop-Rocks if you aren’t a fan of Nerds.


21 Oct


If there is anything that fills me with more terror than animatronics or wax figures, it’s spiders.

I’m sure they mean well, and they have no interest in bothering me at all but I don’t care.

I try to stay as far away from them as possible.

It’s basically why I got married. I have a round the clock spider killer now.

And the best part, other than the fact that he works for free, is that he doesn’t do that stupid thing that men do after they’ve killed a spider for you where they act like they’re going to throw it on you and then laugh as you shriek in terror and start climbing the walls.

So stupid.

That’s grounds for divorce in my book.

I’m pretty sure that any reasonable judge would understand.

“Yes your honor, that’s correct, he pretended to throw a spider at me and then laughed as I ran screaming out the front door and down the street in front of all of our neighbors.”

And can I just say, reparations for emotional damages wouldn’t be a bad idea either.

My spiders aren’t scary. They’re actually pretty sweet even though they do have a bit of an ick factor.

They’re also easy so they are welcome in my house any day.

To make them, the first thing you need to do is make a bunch of Oreo Truffles.

If you have never had these, put them on your to-do list asap.

They’re so good and you can use any flavor of Oreos.

I will say that I prefer to use chocolate chips or candy melts with a little splash of vegetable oil for dipping rather than the Baker’s chocolate called for in the recipe, but you do whatever your heart desires.

To make the spiders, first make two different sized truffles. You’ll need a smaller sized round truffle for the head, and a larger sized truffle for the body. Just use your hands to shape the body so that it looks like a spider’s body.

But before you shape the body completely, add a Gusher (you know those fruit snacks kids love that have the juicy centers?) to the middle and form the truffle around it. That way when people bite into the spider’s body, they’ll get a disgusting yet tasty surprise.

After you’ve dipped the truffles in chocolate, sprinkle on some black sugar sprinkles (this gives them a gross hairy look) and put them on parchment paper to set up. You need to add the sprinkles while the chocolate is still wet though or they won’t stick.

While the truffles are hardening, cut strips of black licorice. You’ll need 8 legs per spider (obviously).

To assemble, just lay the head and body of the spider onto a frosted cupcake. Then carefully tuck the legs into the frosting under the body.

You can pipe or dab on bright green frosting for the eyes, or you can just attach candy eyes while the chocolate is still wet.


18 Oct

candy corn cupcakes

Here’s the thing…

These cupcakes are another baked treat that was made way before I ever thought about starting a blog.

So… they’re not exactly what I’d call picture perfect.

Obviously, that yellow layer should be a bit larger but I think you get the general idea here.

In fact, this whole concept is so easy that I’m not even going to post a recipe.

You just need white cake batter.

You can use a boxed mix.

You can use a scratch mix.

The mix doesn’t matter here, just the method.

Whatever cake recipe or mix you use, adding 1/2 tsp of almond extract will make your cupcakes taste very similar to candy corn. It’s not necessary but it sure does make them taste yummy.

Once your batter is all mixed up and ready for the oven, pour half of the batter into one bowl and add a few drops of orange food coloring. Add the rest of the batter to another bowl and add a few drops of yellow food coloring.

If you don’t have orange food coloring, just add a couple drops of red and a couple drops of yellow and mix. Repeat the process until you get the shade of orange that works for you.

Mix both batters until each color is well incorporated.

See where I’m going with this?

Now fill your cupcake liners about 1/3 of the way with the yellow batter, and fill another 1/3 of the way with the orange batter.

Bake until the tops spring back when you press them gently and frost with your favorite white frosting once they’ve cooled completely.

To make candy corn flavored whipped cream frosting or any candy flavored whipped cream frosting for that matter: Put a big handful of candy and 3 cups of heavy cream into an air-tight container. Seal it up and leave it in your refrigerator overnight.

When you’re ready to make the frosting, strain the heavy cream and whip it on high until soft peaks form. Then slowly pour in a little sugar and continue mixing until it becomes stiff enough for you to pipe or spread on your cooled cupcakes.

How much sugar?

Good question. It largely depends on the candy you’re using. I usually just add a bit, and then taste, add a bit and then taste, until it’s sweet enough.

The candy corn will make the cream pretty sweet so you shouldn’t need too much sugar.

When it comes to candy flavored frosting, it’s best to stick with one flavor. Like banana Laffy Taffy Frosting and not a mish-mash of different flavored Laffy Taffy.

Things can get weird in flavor town.

Once all of your cupcakes are frosted, place a candy corn on top to drive the concept home.

15 Oct

I really hope you guys like cupcakes because I have quite a few to share with you over the next couple of weeks.

If you’re looking for cupcake ideas for your upcoming Halloween party, or even some ideas for how to use up all that candy you’re sure to have very soon, I may have some ideas for you. 😉

Those two cupcakes up there might look time-consuming but actually, they’re pretty easy if you have access to a silicone mold.

I found my skull molds at my local dollar store but you may also find them at craft and baking supply stores as well.

Making the skulls is easy, just pour some melted white chocolate or white candy melts into your molds (assuming you have the molds of course) and wait for them to set up completely. I put mine in the freezer because I’m impatient.

Once the skulls are set, you can literally just pop them right out of the molds and use them however you like.

If you want to make red or blood-shot eyes, just dab a little red food coloring on the inside of the molds with a paper towel or small paint brush before you pour the white chocolate in.

The skull on the left is sitting on a heart made of marbled fondant. I’m a big fan of homemade marshmallow fondant. But if you’re not interested in making any, you can always use the packaged stuff from a baking supply store. It won’t be nearly as tasty though.

This is the recipe and method that I use to make fondant.

Whether you’re using the pre-made stuff or the homemade stuff, you’ll need to color it if you’re going to be doing any marbling. Just add a few drops of color and knead the fondant until you see the marbling that you want.

Then roll out the fondant with a rolling pin until you reach your desired thickness and cut out with a small heart-shaped cutter or the cutter of your choice.

Lay the fondant cut-out on top of the frosted cupcake, set your fancy skull on top, and get ready for lots of ooohs and aaaahs from your friends and family.

I like to use pliable candy like Starburst, Tootsie Rolls, and Airheads to make any additional details like the pink rose buds and bows.

If fondant isn’t for you, you can always use the molds to make the skulls and then just place them on top of your frosted cupcakes…

And… if you prefer a healthier treat, just fill the molds with your kids’ favorite yogurt and freeze until set. I like to add sprinkles or creepy candy eyes to the eye sockets before I fill the molds with yogurt:

14 Oct

That’s right.

I still have a few more tricks and treats to share.

I told you Halloween is my favorite!

These sweet witch hats only require two ingredients and just like everything else I’ve shared so far, are easy to make.

This would be another great project for little hands to help with. If your kids like playing with play-doh, they will love this.

All you need are Tootsie Rolls Minis and caramels. I use the individually wrapped caramels from Kraft for this but use whatever you have as long as it is soft enough to mold.

To make the witch hats:

1. Warm the Tootsie Roll up in your hand a bit by rolling it back and forth.

2. Form the Tootsie Roll into a cone shape. You want it to be wider at the bottom and more narrow at the top. You can do this in your hand or on a flat surface.

3. Take the larger side of your Tootsie Roll and press it down on a flat surface to create the hat’s brim.

4. Pinch the brim a little with your fingers to flatten it out even more.

5. Pinch the narrow end of the Tootsie Roll to make a pointy top. You can leave it pointy or fold it over a bit like I did.

6. Pinch off a small piece of caramel and roll it in your hands to warm it up a bit.

7. Roll it into a log/snake shape.

8. Wrap the caramel around the base of your witch hat.

9. If you want a more fabric-like appearance to your hat, just press lines into the Tootsie Roll using a toothpick.

If the cone-shape thing just isn’t happening for you, don’t worry. Once the Tootsie Roll is warm enough, you can pretty much just shape it by hand.

I put mine on top of some cupcakes but you can use these however you like. Make these a day or two ahead, store them in an air-tight container, and then use them when you’re ready.

11 Oct

These crunchy creepers were made a few years ago, back before I ever thought of starting a blog.

So… unfortunately, I don’t have as many pictures to share as I’d like but I think you can get the idea from the picture above.

Basically, you just make Rice Kripies Treats, mold them a little with your hands while they’re warm, and then use various candies to decorate their creepy faces.

Everything from licorice, to candy corn, to m&m’s, to jelly beans, to chocolate chips – anything goes here.

Use the recipe on the cereal box, or use my favorite treats recipe. I prefer to increase the butter and decrease the cereal called for in the original recipe. I prefer a gooier Rice Krispies Treat.

My go to recipe for Krispies Treats:

Melt 1/2 a stick of butter in a large sauce pan.

Add a bag (usually around 10.5 oz) of mini-marshmallows and stir over low heat until melted.

Turn off the heat and add 5 cups rice cereal. Stir to combine.

To make the heads:

While it’s still warm, grab a handful of the mixture and shape it into a mostly oval shape. Then pinch in the sides a little until it resembles a skull.

Place your candies on top to add facial features. The candy should stick if the treats are still warm. If not, you can use a little frosting or honey as glue.

10 Oct


Here’s another super simple and kid friendly treat.

I made these candy corn parfaits for our Halloween party last year and they took me all of about 10 minutes to put together and that included whipping the cream.

The bottom layer is banana pudding, the middle layer is mandarin oranges, and the top layer is freshly whipped cream sweetened with a little sugar.

I had the little wooden spoons left over from Cam’s birthday party so I just wrapped each one with a little Halloween themed sticky ribbon I found on sale at Michael’s and stuck them in the parfait glasses. You can also usually find small wooden and plastic spoons at most party stores.

My “parfait” glasses are actually votive holders that were never used. I ordered a ton of them for my wedding a few years ago and ended up only using a handful so that left me plenty of extras for party parfaits!

I love using them for parties because they’re just the right size for little ones or for adults to have a small bite of something. They’re also much cheaper than parfait glasses.

You can find clear votive holders at most craft stores for a pretty reasonable price. Be sure to look for any available coupons before you go.