Tag Archives: easy
24 Jun

super greens smoothie

On any given day, if you search the internet for a “green smoothie”, you will undoubtedly find endless variations of just that, green smoothies.

However, I want to let you in on a little secret…

Ready?

You can add spinach to pretty much any smoothie that contains berries and/or pineapple and as long as you blend it long enough, you will not taste it.

Promise.

There are no recipes to follow and you don’t need to get any measuring cups out.

Just get a handful of fresh or frozen spinach and throw it in.

For realsies.

Spinach in smoothies is all well and good but what I really want to tell you about is how to take it a step further and add kale.

Yes, I’m serious.

Kale is good for you. Super good.

Here’s a helpful graphic:

Isn’t it large and informative?

Here’s another graphic just in case you weren’t swayed by the last one:

I drink this smoothie several times per week. I just feel better when I do and I can also see a noticeable improvement in my skin and energy level.

It’s also husband and super picky teenager approved because it tastes like peanut butter and banana – not greens. If that means anything to you.

I used to use fresh kale and just cut the leaves off of the stem. But I recently discovered bagged organic kale at my grocery store for less than $4, so that goes into my cart every week and then right into the freezer when I get home. For this smoothie you can use fresh or frozen greens.

You’ll notice that there are no measurements when it comes to the greens so it’s customizable to your taste. Add as much or as little as you like.

I put two good handfuls of kale and about half a bag of spinach in my smoothie. If it’s too thick, I add a little more almond milk.

It’s a smoothie. It should be simple.

Ingredients:

1 frozen banana – peel and slice a few and store in a resealable freezer bag

1 Tbsp natural peanut butter

1/4 – 1/2 cup yogurt

1 – 1 1/2 cup milk (I use almond milk)

spinach

kale

Just toss all that goodness into your blender and let it whirl for at least a couple of minutes. That gives everything enough time to get thoroughly chopped and blended. Makes for a much tastier smoothie.

If you want more peanut butter flavor, add more peanut butter.

Want a thicker smoothie? Add more banana or yogurt.

Too thick? Add a little more milk.

Now that you’re putting kale in your smoothies, why not take it a step further and put it in rice, couscous, pasta, meatballs, sauces, soups, and mashed potatoes!

Chop it up, saute it in extra virgin olive oil with garlic and a little sea salt until tender and mix it into mashed potatoes. Then top a shepard’s pie with it! I’ve done it – you should too!


* Makes 1 large or two regular sized smoothies.

Gralowly Bars

13 Jun

gralowly bars


These are the granola bars that I give to my kids.

They don’t come individually wrapped in a box.

There’s nothing hydrogenated, high fructose, or artificially flavored about them.

They’re just little bars of oats, nut butter, honey, a little sugar, and whatever seeds and dried fruit I happen to have in my pantry thrown in for good measure.

They got their name from Camryn (naturally). She couldn’t say granola when she was little and “gralowly” was about as close as she could get. Over the years, the cuteness factor caused the name to stick.

Gralowly bars are a bit different from regular granola bars in that they don’t have any puffed rice or sweetened coconut that so many other granola bars have but if you like those things you can certainly throw them in as well.

These bars are dense yet chewy and surprisingly filling.

Making them is easy, there is no baking required, and you can pretty much put anything you want in them.

And because they don’t require refrigeration, they’re great to wrap individually in wax paper or small baggies and throw in your purse for a quick snack when you’re out with your kiddos.

They won’t keep your little ones from screaming their faces off for happy meals but at least you’ll feel better about offering them a healthier option.

Mom win.

Ingredients:

3/4 cup honey

1/2 cup natural peanut butter or any other nut butter (yay protein!)

1/4 cup brown sugar

1 1/2 tsp vanilla extract

1 tsp cinnamon

1/2 tsp sea salt

3 cups quick-cooking oats

1/4 cup seeds  (I used my chia/hemp seed mix – use anything you like)

1/4 cup wheat germ

1/4 cup sliced almonds or other nuts (optional)

Dried fruit  (I used goji berries and cherries. I don’t measure. I just throw in a handful or two)

Chocolate chips   (I don’t measure here either. I just throw in a couple of handfuls)

Directions:

Combine the honey, peanut butter, and brown sugar. This can be done two ways:

In the microwave: Put honey, PB, and brown sugar in a microwave safe bowl & microwave on high for two minutes. Stir halfway through and again at the end of the second minute.

On the stove top: Add all three ingredients to a sauce pan and stir over medium heat until combined. You shouldn’t feel any sugar granules when you stir.

Take off the heat and add the vanilla, cinnamon and sea salt.

In a large bowl add all of the other ingredients. Seriously, just throw all that other stuff in and stir to incorporate everything.

Pour the liquid mixture over the rest of the ingredients and stir to combine.

Dump mixture into a lightly greased 8×8 pan and pack it down to make everything even.

Let the mixture cool completely before turning out and cutting into bars.

Store at room temp in an air tight container for about a week.

* If you prefer puffed rice cereal in your granola bars, reduce the amount of quick-cooking oats to 2 cups and add 2 cups of puffed rice cereal.

* For a cheaper/vegan friendly option, feel free to substitute honey with corn syrup. The consistency is similar so it should work just fine.

A Simple Snack For Summer

10 Jun

frozen fruit & yogurt bites


Is it hot at your house too?

It was 90 degrees here today and it’s only going to get hotter.

Summer is no joke.

Come snack time, cool treats beat out everything else.

So I whipped these frozen fruit and yogurt bites up in just a few minutes for my kids to snack on this afternoon.

They don’t take long at all to freeze either which is a good thing because my kids are not patient people.

As I was eating them I couldn’t help but think that they would be great on top of a salad.

Somebody try that and let me know.

Anyway, to make these for your kids (or yourself) just wash and dry some fresh fruit, then coat in yogurt, add toppings, and freeze on a large plate or sheet pan covered with wax paper until hard.

I added wheat germ, chia seeds, hemp seeds, and a few sliced almonds here and there to the tops of our fruit.

If you’re using a thinner yogurt, you may want to dip them a second time once they’ve firmed up a bit in the freezer so you get a nice thick layer of yogurt. Add your toppings after the second dip.

I used cherries (which had been pitted and cut in half) and red grapes but you could use any fruit you prefer.

Obviously the toppings are up to you as well.

Chopped pistachios and chocolate drizzle over cherries?

Heck yes.

Bring it on summer.


frozen fruit collage

*The chia seeds, hemp seeds, and sliced almonds came from this mix:

FunBites Review & Giveaway!

28 Mar

I was asked recently by FunBites if I would be willing to review one of their cutters.

I’m pretty sure that I was the only blogger left in lunch land that didn’t already have one of these. So I think you know what my answer was.

FunBites come in two styles: Cube It! which makes 12 square bite-sized pieces, and Luv It! which makes a geometric heart pattern and two smaller hearts.

I chose the Cube It!

Using FunBites is easy:

Step 1: Place FunBites cutter on top of food.  Remove popper top and set to the side.

Step 2: Grab cutter handles on both sides, press down firmly and rock 5-6 times to cut through the food.

Step 3: Lift the cutter up, insert popper top and pop out the bite-sized pieces!

FunBites cutters can be used on sandwiches, fruit, veggies, pizza, burgers, tofu, omelets, cheese, pancakes, pretty much anything.

Seriously, these cutters are tough!

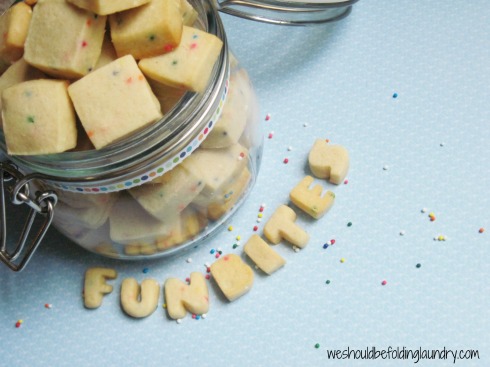
I wanted to do something a bit different with my FunBites Cutter so I used mine to make bite-sized butter cookies. The type of cookie really doesn’t matter here, just make sure your dough is nice and cold.

I like to roll mine out between two sheets of wax paper, so it doesn’t stick, lay it on a sheet pan, and then pop it into the freezer for 20-30 minutes.

Once the dough was chilled and firm, I used my FunBites cutter to cut out the dough squares:

Then I used the popper top to pop them out:

If your dough has chilled enough, you should get nice clean edges just like that up there. However, if your dough sat out for a bit due to… oh, I don’t know, kids who are on spring break and “need you” every two minutes – your dough might not come out so square. If that happens, just tap the edges down lightly with your finger. Easy peasy.

Cookies this size don’t need long to bake. Mine took between 5-7 minutes.

Ta Daaaa!

Cute right!?

Then I got to thinking about other things I could do with the FunBites Cube It!

I had a can of cinnamon rolls in the fridge – perfect! I rolled each of them out just a little and then used the Cube It! to cut little squares. These little cinnamon squares were a big hit with both of my kids. You can serve them with the glaze on the side for dipping as I did below or toss them with the glaze and let them set before you serve them.

I also made:

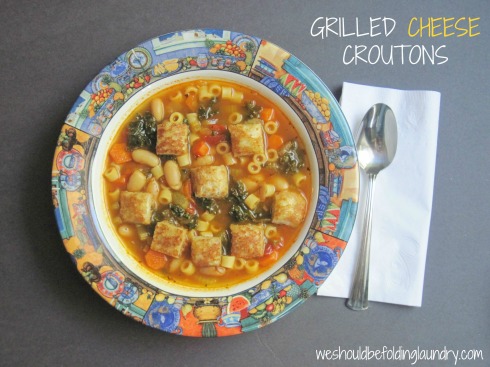
I just made a grilled cheese sandwich, let it cool for a few minutes so the cheese could set a bit, then cut it with my FunBites Cube It! I plopped a few on top of some veggie soup and it was lunch. If you like your grilled cheese to stay more crisp, just serve them alongside the soup rather than in it. Or serve it on a skewer with some lunch meat and/or a tomato in between for dipping, Yum.

And lastly…

If you’re buying croutons you need to stop it! It’s way too easy (not to mention cheaper) to make them yourself. They taste better too. I use whatever bread we have lying around, this is actually whole wheat sandwich bread. I cut the bread with my Cube It! then I tossed it in a bit of extra virgin olive oil, sea salt, garlic powder, and Italian seasoning. Then I toasted it on a sheet pan in a 300 degree oven for a few minutes until toasty.

After using the FunBites Cube It! for a couple of days, I can see where you could literally use it for every meal. I used it for breakfast, lunch, snack, and even a sweet treat but you could also use it to make bite-sized appetizers or to cut food into a safer size for little ones.

FunBites are:

  • Sturdy
  • Easy to use
  • Fun
  • BPA free
  • Made in the USA
  • Dishwasher safe

If you want to learn more about FunBites, or if you want one for yourself, you can visit their website: www.funbites.com.

Or…

Enter my giveaway and win one!

To enter:

1st: Like FunBites on facebook: facebook.com/FunBites

2nd: Like WSBFL on facebook: facebook.com/WeShouldBeFoldingLaundry

3rd:  Tell me in the comments section below which FunBites cutter you would choose if you won, Cube It! or Luv It!

**Rules & other super important info**

You must complete all 3 steps to win!

The winner will be selected by Random.org on April 4th, at noon and notified by email. Winner has 48 hours to respond. If I don’t receive a response from the original winner within 48 hours, I will choose another winner via Random.org.

This FunBites giveaway is open to all residents of the US & Canada.

Disclosure: I received a FunBites Cube It! cutter to review. No other compensation was provided by FunBites. All photos are the property of WSBFL and opinions given in this review are solely my own.

* This giveaway is now closed.

Daily Bento

4 Mar


For lunch today, Cam has a chicken sandwich in swirled white/wheat bread, strawberries, & tortilla chips.

I really love today’s lunch. Even though it was super simple and quick to make, I think it’s just as beautiful as any of the more intricate lunches I’ve made in the past.