Tag Archives: cookies
27 Sep


Tuesday was my second blogiversary.

Can you believe it? Two years!

Since two years of blogging deserves a special treat, I thought long and hard about what I wanted. After all, who do you think does all the work around here?

I’ve seen far too many extravagant and not to mention time-consuming layer cakes and other fancy desserts styled, photographed, and posted on other food blogs on their blogiversaries to know that that’s not the direction I wanted to go.

I love thinking up new recipes, testing them, and then sharing them here with you when they turn out well. However, I always try to keep things as simple as possible.

Let’s face it, if I post a recipe that contains twenty ingredients, requires special equipment, and takes all day to make, the likelihood that anyone is ever going to try that recipe out in their own kitchen is well, zilch.

So I thought about how I could make something that was special but also simple at the same time. It also had to contain the flavors I love the most (salted caramel, coffee, and chocolate).

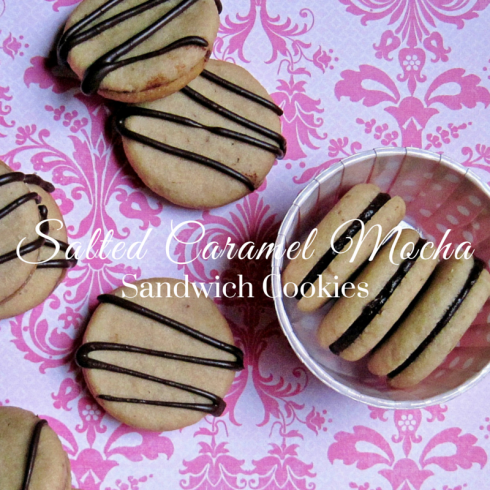
After much consideration, I finally settled on these:

Salted Caramel Mocha Cookies

The reason that it took me so long to get this post up for you guys is because it took me all week to figure out what to call these cookies.

On their own, the shortbread cookies taste just like a cappuccino. If you fill them with chocolate and/or add a chocolate drizzle on top, they taste just like a cafe mocha. However, if you take it a step further (and you totally should) and add the salted caramel, the finished cookies taste like a Salted Caramel Mocha from Starbucks, only not as cloyingly sweet. So that seemed like the logical choice.

I love this shortbread recipe because the finished cookies are so buttery and light that they melt in your mouth. If you’ve ever had a Pecan Sandie, you’re already familiar with the texture. You could actually leave the espresso out and add chopped, toasted pecans and you’d have the best homemade Pecan Sandies you’ve ever had in your life.

You can also tailor the filling to suit your taste. You can go heavy on the chocolate and light on the salted caramel or vice versa, or you can leave either one out all together. Honestly, they’ll be delicious either way. Just make sure you let both the chocolate and salted caramel cool and thicken a bit before you fill your cookies or your tops will just slide off and you’ll have a mess.

These cookies are made in three parts but I’m going to break everything down for you. Don’t worry it’s easy. If you like cappuccino, salted caramel, and chocolate, you will love these cookies!

Salted Caramel Mocha Cookies


Cappuccino Shortbread Cookies

2 sticks of unsalted butter – at room temp

1 egg yolk

1/2 cup sugar

2 cups AP flour

1/4 tsp salt

2 tsp instant espresso

1 1/2 tsp vanilla

Directions

The secret to these cookies is all the beating you’re about to do but don’t skip it! I’m telling you, it’s worth it.

Beat the butter using your hand or stand mixer on medium speed until it’s very light and fluffy. Should be about five minutes.

Add the egg yolk and sugar and beat for another five minutes. I know, just do it.

Add the salt and flour in one heaping spoonful at a time, making sure your mixer is on low so you don’t fling it all over your kitchen. Once all the flour is incorporated, beat another couple of minutes on medium speed for good measure.

Now add the remaining ingredients and continue beating until well combined.

Cover and refrigerate the dough for about an hour until chilled and firm.

Scoop the dough using a teaspoon measure, roll into balls, and place about an inch apart on a parchment or silpat lined baking sheet.

Cover the dough balls lightly with plastic wrap and use the bottom of a glass to gently flatten each one a little. You want them all to be about the same size because you’ll be matching them up later. Don’t stress about it though.

Gently peel off the plastic wrap and bake the cookies for 7-9 minutes in a preheated 350 degree oven.

The cookies are done when they are firm on top but have only browned a little around the edges.

Let the cookies cool on the pan for a few minutes before you move them to a cooling rack or they will fall apart.

While the cookies cool, you can make the caramel.


Salted Caramel Sauce

adapted from Domino Sugar

2 tbsp butter

1/4 cup heavy cream

1/2 cup brown sugar

1/2 tsp sea salt

1/2 tsp vanilla

Directions

In a deep microwaveable bowl or a measuring cup that holds at least 2 cups, melt the butter in the microwave completely.

Gently whisk in the heavy cream and sugar and microwave for two minutes, stirring gently after the first minute.

When the caramel sauce is amber-colored and there are no grainy bits of sugar left, add the remaining ingredients and set aside to cool.


Chocolate Filling

1/2 cup semi sweet chocolate chips

1/4 cup heavy cream

Directions

Heat the cream in the microwave until it is scalding hot but not boiling.

Add the chocolate chips to the cream and let sit for a couple of minutes so that the hot cream can begin melting the chocolate.

Stir gently until the chocolate is completely melted and combined with the cream.

Put in the refrigerator to cool and thicken for a few minutes.


Once your salted caramel and chocolate filling have cooled a bit and thickened, you can assemble the cookies!

Spread some salted caramel or chocolate filling (or both) on the bottom (flat side) of each cookie and set aside. Be sure to leave a little room around the edges so that when you put the tops on, your filling doesn’t squish out.

Now this part is totally optional but I heartily encourage you to add 1/4 tsp of instant espresso to about 1/4 cup of melted semi sweet chocolate and then drizzle that over your cookies. This really puts the flavor over the top!

You can either leave the cookies out at room temperature until the chocolate sets or if you’re impatient like me, you can set your cookies on a tray and put in the fridge for about five minutes and they’ll be perfect.

You could also just shove them right into your mouth. Your call.

Enjoy!


Kitchen Sink Cookies

3 Dec

Kitchen Sink Cookies


There aren’t a lot of things that I do extraordinarily well.

Driving a car with a manual transmission, cartwheels, wearing white without spilling something all over it, washboard abs…

Yeah, not so much.

I also never spell exercise, separate, or nauseous correctly either. The only reason those three words are spelled correctly now is because of spell check and its angry red lines.

What I can do well is bake. Which is cool because I reeeally like to eat.

This also would explain why I’ll never have those aforementioned abs. And that’s fine with me. Whoever said that “nothing tastes as good as being skinny feels” has obviously never had a patty melt with cheese fries and extra cheese sauce from Steak n’ Shake at 2 a.m. after a few cocktails… or microwaved a donut.

Getting back on track…

These cookies actually came to be because I couldn’t decide if I wanted to bake spice cookies, chocolate chip cookies, or oatmeal cookies.

All I knew is that I wanted a cookie.

Then I thought why should I have to choose?

I’m terribly indecisive anyway. Ask my husband – I’m the worst.

I basically never have an answer for ANYTHING.

So I just made a cookie that had everything I wanted in it.

I made… Frankencookie.

And it was Frankendelicious!

There were almost no cookies to photograph because I could not stop eating them.

They’re crispy on the edges but chewy on the inside (as they should be) and they’re just sweet enough with a hint of spice in the background.

They’re pretty much everything I want in a cookie.

And that’s saying a lot about a cookie that contains no dark chocolate or caramel.

Even the dough is delicious and I’m not a dough eater. I always taste a bit to make sure the flavor is right before I put it in the oven but I found myself going back for more over and over.

You certainly do not have to use all of the mix-ins that I used. I had a surplus of dried fruit, nuts, and seeds so I chopped them all up and tossed them in. Just use any combination of your favorite dried fruits, nuts, seeds, and chocolate chips.


Kitchen Sink Cookies

2 sticks of unsalted butter

1 cup granulated sugar

1 cup brown sugar

2 eggs

1 1/2 teaspoons vanilla extract

2 cups all-purpose flour

1 teaspoon baking soda

1 teaspoon salt

1 1/2 teaspoons cinnamon

1/4 teaspoon ginger

1/8 teaspoon nutmeg

2 cups old-fashioned oats

Mix-ins: I just threw in a few good-sized handfuls. If I had to guess, I’d say it was probably a cup and a half to two cups worth of the goods.

My mix-ins:

  • Dried Apples
  • Dried Cranberries
  • Dried Blueberries
  • Dried Cherries
  • Dried Lingonberries
  • Raisins
  • Walnuts
  • Pecans
  • Sunflower Seeds
  • Pumpkin Seeds
  • Flax Seeds
  • White Chocolate Chips

Directions

Using a hand or stand mixer, cream the butter and both sugars until the mixture is light and fluffy. Should take 2-3 minutes.

Beat the eggs in one at a time followed by the vanilla.

In a separate bowl, add flour, baking soda, salt, spices, and oats and whisk together to combine.

Add the dry ingredients to the butter and sugar mixture and mix just until everything is incorporated.

Add your mix-ins and mix gently to combine or fold in with a spatula or wooden spoon.

Cover and chill the dough for an hour.

Line your cookie sheet with parchment or spray with non-stick spray.

Use a tablespoon measure to form dough balls and place them about 2 inches apart on the cookie sheet.

Bake in a preheated 350 oven for 12-15 minutes.

The time they need to bake will depend on your oven. Cookies are done when they are golden brown around the edges and no longer look wet on top. You want to pull them out of the oven when they are just set so they stay chewy in the middle.

Allow the cookies to cool for a couple of minutes on the baking sheet before transferring them to a wire rack to cool completely but be sure to eat a few while they’re still warm.

21 Jul


Did you know that just about every day is a food holiday?

I can’t make these things up. This is real stuff.

Seriously, if you have a favorite food it probably has it’s very own day set aside every year to be celebrated.

Love Cheese Doodles? March 5th is your day!

Do you get excited over egg salad? You get a whole week! April 12-18.

And for those of you who still secretly munch away on Play-Doh, September 18th is your day. So go nuts!

Yesterday was National Ice Cream Day and today is National Junk Food Day, so I really feel like we’re covering all of our bases with this dessert.

It’s really easy to make. The hardest part is waiting for everything to set so that you can eat it! You can’t really rush this pie since each layer will need to firm up before you add the next or you’ll end up smearing everything together. So plan on at least 6 hours before you will be able to actually eat it.

Do you have to make homemade ice cream? Nope, you can buy the store-bought stuff and save yourself a step.

I’m a big fan of homemade ice cream because it’s super easy to make and I know exactly what’s in it (less than 5 ingredients in most cases, all of which I can pronounce).

If ice cream pie isn’t your thing, that’s cool. You can always get your penuche on tomorrow.

Pie Crust:

22-24 Oreos

4 tbsp melted butter

Directions:

Put the cookies into a large resealable plastic bag, seal it, and beat the heck out of them until they’re all crushed up. You can also put your cookies into a food processor (if you have one) and give them a spin until you get cookie crumbs.

Dump your cookie crumbs into a large bowl, add the butter, mix to combine.

Press the cookie/butter mixture into your pie plate making sure to get that mixture up the sides a bit.

Then put it in the freezer to chill for at least half an hour and get started on your ice cream.

Super Simple Minty Oreo Ice Cream:

2 cups heavy cream

1 can sweetened condensed milk – The only ingredients in that can should be milk and sugar.

Crushed Oreos or store brand cookie similar to Oreos

1 tsp peppermint extract

Directions:

In the bowl of your stand mixer, with a hand mixer, or a whisk, whip the cream to stiff peaks. Scoop a bit of cream with your mixer or whisk (even your finger will work) and have a look. If the cream holds it’s shape, you’re good. If it runs off the whisk back into the bowl, you have more mixing to do.

If you’ll be whipping with a mixer or by hand with a whisk, a metal or glass bowl will work better than a plastic bowl.

Add the peppermint extract and slowly drizzle in the sweetened condensed milk while mixing just until everything is incorporated.

Fold in your crushed cookies. How many? As many as your heart desires. This isn’t baking, we don’t need to be super exact. Just add cookies until it looks right to you.

When your ice cream is ready to go, spread a layer over the crust and put back into the freezer to set for about an hour. If you’re not going to be adding a tasty surprise middle layer, you can just fill the crust with the ice cream, freeze for 4-6 hours, and then top with whipped cream.

However, if you’re like me and need to have a layer of fudge, cookies, and/or candy in the middle of your pie to make life complete, you’ll want to keep this first layer of ice cream fairly thin to accommodate the next two layers.

Once the first layer of ice cream is set, add a layer of cookies, fudge, brownie pieces, Andes mints, York peppermint patties, whatever! And then – you guessed it, back into the freezer to set. This layer only needs about 30 minutes. And don’t use hot fudge that is literally hot for obvious reasons. Warm it if you need to but just enough to make it spreadable.

Add your last layer of ice cream and put the pie back into the freezer for another couple of hours (at least) to firm up.

Whipped Cream:

1 cup heavy whipping cream

2 tbsp granulated sugar

1/2 tsp vanilla extract

Directions:

In a large bowl (preferably metal or glass), whisk the cream until it starts to firm up a bit, then add the sugar. Continue whisking until the cream reaches stiff peaks.

You can pipe your whipped cream onto your pie or just spread it on. Either method will yield equally delicious results!

Serve right away or put the whole thing back into the freezer so that the whipped cream can firm up a bit. Totally your choice.

You should end up with quite a bit of extra ice cream. Put that in an airtight container and pop it in the freezer to enjoy another time.


Now, if you’re not crazy about the whole two layers of ice cream with a surprise in the middle situation, but still want a tasty surprise somewhere in that pie, just add your candies or fudge or whatever right on top of the crust, fill with ice cream, freeze for 6 hours, top with whipped cream, and then eat it!


* To make slicing easier, keep a glass of hot water close by to dip your knife into in between slicing. Just dip, swirl, wipe with a paper towel, and slice. Letting your pie sit out for a few minutes will make slicing easier too.


Caramel Apple Oatmeal Cookie & Bourbon Ice Cream Sandwiches… with Bacon!

4 Jul


I’ll bet you thought I was going to come at you today with some patriotic-themed, tri-colored dessert that was all hopped up on sprinkles and glitter to celebrate the holiday.

Nope.

The 4th of July just isn’t one of my favorite holidays.

Yes, I’m glad to be an American and to have my independence. I just don’t care to celebrate it fighting crowds of people to walk one mile to stand for 45 minutes all to watch about 10 minutes of fireworks and then fight that same crowd of people back a mile to my car so I can drive in traffic all the way home in the rain.

Every year people. Every year.

And can we talk about “those people” who are still lighting fireworks and making all kinds of noise at 2 in the morning as if no one in the neighborhood has to get up early for work the next day?

Newsflash people: The 4th is a holiday. The 5th is just another day.

Personally, I’d rather celebrate my independence in stretchy pants… and with bourbon!

I’d rather celebrate everything in stretchy pants and with bourbon if we’re being truthful here, and I think that we are.

So seeing as how it’s a holiday and everything, I figured, why not celebrate my way!

So I put on some stretchy pants, broke out the bourbon, and made us a treat.

Happy 4th!

bourbon bacon ice cream

Bourbon & Bacon Ice Cream:

2 cups heavy cream

1 can sweetened condensed milk

2-3 tbsp bourbon

1 tsp vanilla extract or vanilla bean paste

2 to 3 strips of cooked, cooled, and crumbled bacon

Directions:

With a stand mixer, electric mixer or a whisk, whip the heavy cream to stiff peaks.  Add the bourbon, vanilla, and slowly pour in the evaporated milk. Stir gently or fold until combined.

I usually use my stand mixer and just let it run on low while I add the sweetened condensed milk, then I crank it back up for a couple of seconds to make sure the peaks remain stiff.

Fold in the crumbled bacon.

Put mixture into a container with a tight-fitting lid and pop into the freezer for 6 hours or until frozen.

I usually separate the ice cream mixture so I can flavor half for my kids and the other half for us grown folk.

If you’re making an entire batch of bourbon ice cream, you may need more than 3 tablespoons. Just keep tasting as adding as you see fit. Be advised though that the more alcohol you add, the faster your ice cream will melt as it did in my pics.

If bourbon isn’t your thing remember, the sky is the limit with this ice cream. You can pretty much add in anything before you pop it into the freezer so go nuts. Add fruit, nuts, chocolate, sprinkles, birthday cake, brownie pieces, candy, cookies, whatever!

Caramel Apple Oatmeal Cookies

2 sticks unsalted butter

1 cup granulated sugar

1 cup brown sugar

2 eggs

1 tsp vanilla

2 cups all-purpose flour

1 tsp baking soda

1 tsp salt

1 tsp cinnamon

1/2 tsp apple pie spice (optional)

3 cups quick-cooking oats

1 cup dehydrated apples

1 1/2  cups caramel pieces or chips (I used the individual wrapped caramels and cut them into smaller pieces)

Directions:

In the bowl of your stand mixer or with an electric mixer, beat the butter until nice and fluffy. Then add both sugars and mix until combined. The mixture should be light in color and fluffy.

Add the eggs and vanilla and mix to combine.

In a separate bowl, whisk together the flour, baking soda, salt, cinnamon, and apple pie spice.

Add to the wet mixture and stir until everything is barely incorporated. It’s important to not over mix or you’ll end up with tough cookies.

Fold in the oats, apples, and caramel pieces just until everything is incorporated.

Pop the mixture in the fridge for an hour. There’s a lot of butter in this dough and giving it a chance to chill will help to make sure that your cookies set up nicely in the oven.

Preheat your oven to 375 degrees and use a tablespoon measure to scoop out balls of dough.

Line a baking sheet with parchment or a silpat or lightly grease it and place your dough balls a couple of inches apart.

Bake for 8-10 minutes.

Do not over bake, you want these cookies to be soft.

Also, give the cookies a minute or two to set up once you pull them from the oven. Caramel turns to liquid when it’s heated and if you try to remove your cookies from the pan right out of the oven, they may fall apart.

Once the cookies have completely cooled, fill with ice cream and enjoy!

* I just wanted to add that this is my 200th post! Thanks to everyone who stops by my little space on the internet regularly to see what I’m up to. I’m sure there are plenty of other more important things that you could be doing with your day (like folding laundry) so the fact that you choose to avoid your responsibilities and visit here for a little while instead makes my heart happy.

FunBites Review & Giveaway!

28 Mar

I was asked recently by FunBites if I would be willing to review one of their cutters.

I’m pretty sure that I was the only blogger left in lunch land that didn’t already have one of these. So I think you know what my answer was.

FunBites come in two styles: Cube It! which makes 12 square bite-sized pieces, and Luv It! which makes a geometric heart pattern and two smaller hearts.

I chose the Cube It!

Using FunBites is easy:

Step 1: Place FunBites cutter on top of food.  Remove popper top and set to the side.

Step 2: Grab cutter handles on both sides, press down firmly and rock 5-6 times to cut through the food.

Step 3: Lift the cutter up, insert popper top and pop out the bite-sized pieces!

FunBites cutters can be used on sandwiches, fruit, veggies, pizza, burgers, tofu, omelets, cheese, pancakes, pretty much anything.

Seriously, these cutters are tough!

I wanted to do something a bit different with my FunBites Cutter so I used mine to make bite-sized butter cookies. The type of cookie really doesn’t matter here, just make sure your dough is nice and cold.

I like to roll mine out between two sheets of wax paper, so it doesn’t stick, lay it on a sheet pan, and then pop it into the freezer for 20-30 minutes.

Once the dough was chilled and firm, I used my FunBites cutter to cut out the dough squares:

Then I used the popper top to pop them out:

If your dough has chilled enough, you should get nice clean edges just like that up there. However, if your dough sat out for a bit due to… oh, I don’t know, kids who are on spring break and “need you” every two minutes – your dough might not come out so square. If that happens, just tap the edges down lightly with your finger. Easy peasy.

Cookies this size don’t need long to bake. Mine took between 5-7 minutes.

Ta Daaaa!

Cute right!?

Then I got to thinking about other things I could do with the FunBites Cube It!

I had a can of cinnamon rolls in the fridge – perfect! I rolled each of them out just a little and then used the Cube It! to cut little squares. These little cinnamon squares were a big hit with both of my kids. You can serve them with the glaze on the side for dipping as I did below or toss them with the glaze and let them set before you serve them.

I also made:

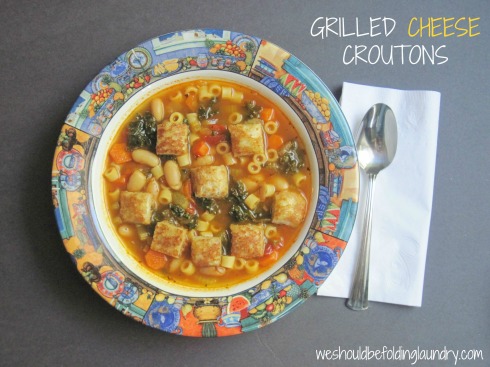
I just made a grilled cheese sandwich, let it cool for a few minutes so the cheese could set a bit, then cut it with my FunBites Cube It! I plopped a few on top of some veggie soup and it was lunch. If you like your grilled cheese to stay more crisp, just serve them alongside the soup rather than in it. Or serve it on a skewer with some lunch meat and/or a tomato in between for dipping, Yum.

And lastly…

If you’re buying croutons you need to stop it! It’s way too easy (not to mention cheaper) to make them yourself. They taste better too. I use whatever bread we have lying around, this is actually whole wheat sandwich bread. I cut the bread with my Cube It! then I tossed it in a bit of extra virgin olive oil, sea salt, garlic powder, and Italian seasoning. Then I toasted it on a sheet pan in a 300 degree oven for a few minutes until toasty.

After using the FunBites Cube It! for a couple of days, I can see where you could literally use it for every meal. I used it for breakfast, lunch, snack, and even a sweet treat but you could also use it to make bite-sized appetizers or to cut food into a safer size for little ones.

FunBites are:

  • Sturdy
  • Easy to use
  • Fun
  • BPA free
  • Made in the USA
  • Dishwasher safe

If you want to learn more about FunBites, or if you want one for yourself, you can visit their website: www.funbites.com.

Or…

Enter my giveaway and win one!

To enter:

1st: Like FunBites on facebook: facebook.com/FunBites

2nd: Like WSBFL on facebook: facebook.com/WeShouldBeFoldingLaundry

3rd:  Tell me in the comments section below which FunBites cutter you would choose if you won, Cube It! or Luv It!

**Rules & other super important info**

You must complete all 3 steps to win!

The winner will be selected by Random.org on April 4th, at noon and notified by email. Winner has 48 hours to respond. If I don’t receive a response from the original winner within 48 hours, I will choose another winner via Random.org.

This FunBites giveaway is open to all residents of the US & Canada.

Disclosure: I received a FunBites Cube It! cutter to review. No other compensation was provided by FunBites. All photos are the property of WSBFL and opinions given in this review are solely my own.

* This giveaway is now closed.