Archive | Gettin’ Crafty RSS feed for this section
25 Oct

Halloween bento picks


I wish I could claim to be the crafty genius who came up with the idea for putting puffy stickers on toothpicks or plastic cocktail picks to create homemade bento picks but honestly, it’s been done so many times that I couldn’t even tell you where it originated from.

I can however show you my favorite way to make bento picks.

I really think you guys are going to love it.

First though, in case there are those of you who aren’t familiar with the puffy sticker/toothpick methods, I’m going to walk you through each one.

I’ll also explain why I don’t like either of them.

Seems like I’m always rebelling against something on this blog. Today it’s puffy stickers, tomorrow – who knows?

There are two ways to make food picks using puffy stickers.

Method 1 : The puffy sticker is hot-glued directly onto the toothpick or plastic cocktail pick. Once dry, it’s ready to use.

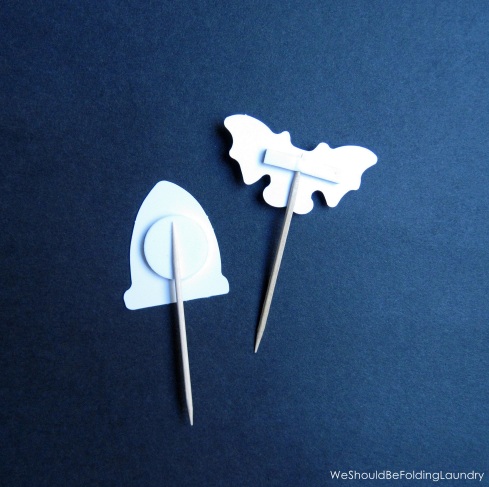
Method 2: Mirror images of stickers (like the set pictured below) are stuck together with the toothpick or plastic cocktail pick in between.


bento picks - Halloween 005


My first issue is with the glue. It can be messy and you have to wait for it to dry.

You also need to press the stickers for a minute or two to keep the bottoms together while the glue sets.

And if you don’t use glue, the bottoms of your stickers will come apart. You can see this happening in the picture at the very top of this post.

It’s not a big deal but as a perfectionist, this really bothers me.

Now let’s talk about my favorite way.


bento picks - Halloween 038


I love to use scrapbooking stickers.

They’re almost always 40%-50% off at my local craft store. I think I paid about $1.60 for those googly-eyed cuties up there.

The reason that I love using scrapbooking stickers for this project is because they all have a piece of sticky foam on the back so I can just run my toothpick right up into that foam and it’s not going anywhere.

See…


bento picks - Halloween 048


Quick and easy.

No waiting for glue guns to warm up or messy glue to dry and then peeling it off of your fingers later.

This takes two seconds and it’s done.

You can also just stick a toothpick onto the back, like I did with the pick on the left, and it will hold just fine.


bento picks - Halloween 052


Pretty cute, right?

I love them.

Camryn has a field trip on Halloween so I’ll be packing some of these cute picks in her lunch that day.

If they don’t make it home, it’s no biggie. They’re disposable anyway.

So if you’re looking for a cheap and easy way to spruce up your kiddos lunches for Halloween, or really any day, I hope you’ll give this method a try.

Remember, these work great as cupcake toppers too!


Camryn’s Birthday

3 May

Cam turned seven last Friday.

Since her besties have all moved away, we decided to have a family celebration at home and then take her to a local bouncy place that she loves.

I asked her what kind of birthday cake/cupcakes she wanted and she said “Hello Kitty” so I took that information and ran with it.

I did the majority of the baking while she was in school Thursday so that Friday, all I had to do was a little dipping, a little decorating, and a little set up.

We set up a little Hello Kitty treats table in her bedroom and when she got home that afternoon, I told her to go change into some shorts so that we could go bounce.

She was so surprised when she walked into her room and saw everything set up. It was a really precious moment.

She saw the table and asked me if it was all for her. Goodness gracious.

Since I used quite a few things from my lunch packing stash to make her day so sweet, I wanted to share some pics with you guys to show you how you can use bento supplies for something other than making lunches.

I also wanted to share some budget friendly party tips that I hope you might find useful.

Here are a few pictures from her special day:


cam's 7th birthday treat table

I’ve done a lot of treat/dessert tables for various parties and I really like having a background of some sort. It ties everything together and provides a great focal point. I once spent days making a huge paper floral backdrop for a party but that’s a story for a different day. It’s not work if you love it, right?

Hello Kitty paper background: I found some HK coloring paper rolls at Michael’s (local craft store) for $1 a piece and immediately thought that they would make a perfect backdrop. Incidentally, I found HK coloring paper rolls at Super Target next door that were twice the size so if you’re looking for this paper, check Target and your local craft stores.

I’ve also used this paper to line tables at a party so that party guests could color if they wanted to. You’d be surprised by how many adults actually end up coloring.

Hello Kitty garland: This is just HK themed scrapbook paper that I bought at Michael’s. I cut triangles, punched holes in each corner and strung a ribbon through to hang it. Scrapbook paper is very inexpensive and can be used in countless ways. In fact, I don’t think I’ve ever thrown a party without it.

Red tissue puff decoration: I’m sure you’ve seen these everywhere. This is just 8 small sheets of tissue paper folded accordion style, paper clipped in the middle to keep together, and then fluffed up by gently separating each layer. I can usually get a pack of 12 sheets of tissue paper pretty much anywhere for .99 or less.

Red table cover – A set of two plastic table covers that I purchased at Super Target for less than $2. The cheap table covers tend to be thin so I like to double up whenever I can.

Framed Hello Kitty pictures – I found the frames at Michael’s for $2 a piece. The pink starry background is scrapbook paper that I already had in my stash that I cut to fit inside the frames. The HK graphic is just a set of stickers that I also found at Michael’s. This project cost me about $11 to make but that was only because I could not get my mobile coupons to work. I ALWAYS use a coupon when I shop at Michael’s because it regularly saves me 30%-40%.

Hello Kitty figurine: This is Cam’s piggy bank. It normally lives on the shelf of her headboard but I re-purposed it for her party.

Hello Kitty, Keroppi, Chococat, and My Melody decorations: These are cake toppers that I purchased here. These have been featured in a few of Cam’s lunches.

Pink and white striped boxes: These served two purposes: They acted as risers for some of the food plates and they hid Cam’s presents! All of her presents fit into those cute pink striped boxes. I purchased them at Target for $2.99 a piece, stuck a few HK stickers from the same pack that the framed stickers were in on the side and called it done. The best part, is that I can use these boxes over and over.


cam's 7th birthday

Let’s talk about what’s on that table.

The Glass bottles are Starbucks Frappuccinos that we drank over the course of the week, ran through the dishwasher, and soaked in vinegar to get the sticker residue off. When they were dry, my husband rimmed each one with a Hello Kitty sticker, added a little strawberry juice to the bottom of each bottle, and then topped them off with lemon/lime soda.

I bought the silly straws at Michael’s for $1.50.

I love the way these bottles look on a party table. They would be adorable rimmed with rainbow sprinkles and filled with strawberry milk. These were supposed to be rimmed with Pop Rocks but my husband forgot them when he ran out for a couple of last-minute things that day. :/

During Cam’s party, we dropped big chunks of cotton candy into our sodas. This is really neat to watch. The soda bubbles up and the cotton candy instantly disintegrates. This would have been made much more fun with the addition of Pop Rocks. Maybe next year.

The four small red and pink candies at the front of the table are vanilla Oreo truffles that I molded using some of Camryn’s Moon Sand molds and covered in red or pink candy melts. I washed the molds in the dishwasher before I used them.

In the glass jars off to the right side of the table are strawberry Pocky, Hello Kitty cotton candy (yes, there is a HK brand of cotton candy!) which I found at Wal-Mart, and strawberry malted milk balls. She had so hoped the Easter Bunny would bring her some of those last week but he (ahem… she) couldn’t find any.


cam's 7th birthday

I think now is a good time to tell you that my kids normally don’t eat a lot of sugary foods but on their birthdays, they’re allowed to go nuts.

Now let’s move on because we need to discuss those cones. Their cuteness is still killing me. They were also really easy to make.

These are normally made with cake balls but I personally don’t care for cake balls. They just don’t do anything for me (probably a texture issue) so these babies were made with donut holes. Yep. Store-bought donut holes which made the process so much easier and they fit the mini cones perfectly.

I put a few mini m&m’s in the bottom of each cone. Then I dipped the bottom of each donut hole in some pink candy melts and set it in the cone, pressing down a little to ensure a good seal. When the candy is dry, it seals the donut hole to the cone so you can dip the entire thing in the candy melts, let the excess drip off, and let dry. I melted a little chocolate for the drizzle on top, and used a spoon to guide the melted chocolate down onto the cone to give the appearance of dripping chocolate. Then I added a few sprinkles and a red mini m&m before it dried.

These were by far the cutest food item at the party. Yummy too!

Next up…marshmallows.

Sparkly marshmallows couldn’t be easier to make. If you like peeps, these will be right up your alley. To make them, just insert a toothpick or super cute food pick of some sort (preferably one that matches your theme) into the marshmallow, dip quickly in clean water, and then roll in sparkly sanding sugar. That’s it. I like to set mine on wax paper until they’re dry.

To make the red-bottomed marshmallows, which photographed hot pink instead of red because her room is dark and my camera is old, just dip marshmallow bottoms into melted red candy melts, allow excess to drip off, add sprinkles if you want them, and set on wax paper to dry.

To make dipping easier, I ALWAYS add a little Crisco or veg oil to my candy melts. If you don’t there’s a good chance it will seize up on you and you won’t get a smooth, shiny finish. I only use Crisco for fondant work and candy melts but if that grosses you out, you can use coconut oil.

Just add a couple of tablespoons of your oil of choice per bag of candy melts, pop it in the microwave for 30 seconds, stir, pop back in for 30 seconds, stir. Repeat until smooth and melty and dip until your heart’s content.

Insert lollipop sticks before dipping if you want to serve them on sticks which is always super cute and fun for little ones.


cam's 7th birthday

I just loved these white sparkly marshmallows with the red HK bow picks.

cam's 7th birthday

Pictured above are slices of pound cake that I cut with a flower shaped cookie cutter and covered in melted canned frosting.

Let’s pause here because I can hear some of you gasping.

Yes, I am normally a from scratch kind of baker. But it is much easier and often cheaper to buy the canned stuff, zap it in the microwave until pourable, and then use it to cover baked goods with a satiny smooth finish. I haven’t been able to accomplish this with homemade frosting.

On top of each piece of cake is a red (yes, red.) marshmallow fondant decoration that I made using my new bento tools. They worked perfectly with the theme. The blue sevens are actually the L from this set turned upside down.
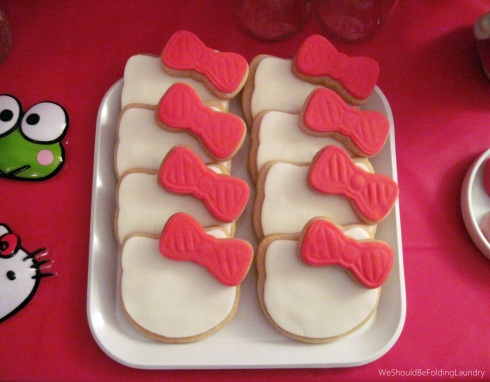
cam's 7th birthday - hello kitty cookies

 I love how cute these cookies turned out. Even though there isn’t a lot of detail, you can still clearly tell who it is. These are just simple sugar cookies that I cut into HK shapes using cookie cutters, spread with a little vanilla frosting, and topped with marshmallow fondant that I cut and stamped using the bow from this set.


hello kitty & friends cupcakes


For her birthday, Camryn had strawberry cupcakes with vanilla buttercream. We girls like Hello Kitty’s friends just as much as Hello Kitty so I made sure to include them too. HK’s friends were all made very late at night by me out of marshmallow fondant. I bought the Hello Kitty cupcake toppers from my favorite online bento supply store.


Camryn's new bento

Camryn was so delighted to find the new Cutezcute Baby Night Owl bento box in one of her gift boxes. She had her little heart set on this bento box for a while so this was a fun surprise. I have to say, this bento box is small but it’s beyond adorable. It’s going to take some planning on my part to get her lunch to fit in there so stay tuned for updates.

At this point my camera had died and I was snapping away with my phone so I apologize for the blurry picture.

After a few treats and presents, we headed out to the bouncy place. There was no one there when we arrived so for a while, Cam had the whole place to herself.


She was in absolute bouncy heaven until about 6:30 that evening when she came running over to me crying about not feeling well. We had planned to go out to dinner after bouncing but when her fever spiked and the full wrath of the impending bout of strep/scarlett fever hit, we knew we would be in for the night.

And that’s how it all ended. It wasn’t pretty but she had a brand new Kindle Fire tablet with a neato squishy pink cover to keep her mind off of how bad she felt.

Even though her day didn’t go quite how we planned, I’m just thankful that she was able to enjoy most of it.

No Tricks. Just Treats.

29 Oct

halloween treat bucket

My kids don’t trick or treat.

They prefer to do Halloween at home.

No need to feel bad for them though. They get more than enough sweets and treats.

We wear costumes, play games, watch Halloween shows on t.v., and Cam usually hands out candy to the other kids in the neighborhood.

My son lost interest in trick or treating a long time ago. He’s nearly 6 ft tall and over 180 lbs, so people always thought he was a grown man in a mask approaching them for candy. And most people aren’t cool with that.

Then, not too long ago, my daughter figured out that walking around from house to house in the dark asking for candy from strangers just wasn’t all it was cracked up to be and perhaps her brother was on to something.

So every Halloween I make them their own special treat bag or bucket filled with their favorite candy, and some fun little treats. Just so they don’t feel like they missed out on anything.

Last year the kids got cauldrons because I was a witch:

This year they get buckets because I couldn’t find the cauldrons.

I found my buckets in the $1 section of my local Target.

All of the candy came from Walgreen’s.

The Nestle Crunch and 100 Grand bars are all .49 this week at Walgreen’s if you use your Register Rewards card. Those are just taped onto some long lollipop sticks and stuck down into the bucket.

The Reese’s Peanut Butter Pumpkins were .69 each. Those are also taped to lollipop sticks.

I also bought 3 bags of Snickers fun-sized bars for $1.99 each. I used this coupon and paid $3.97 out of pocket for all three bags. I also got $1.50 in Register Rewards back to use towards my next purchase. I used the Snickers bars to fill the bucket and keep the lollipop sticks from sliding around.

The embellishments are just stickers that I found on sale for 50% off yesterday at Michael’s. I attached toothpicks to the backs and stuck them wherever there was a space that needed to be filled.

If anything was too wobbly for me, or was sliding around a little too much, I just added a little tape to the back and attached it to whatever was behind it to stabilize it. The 100 Grand and the Reese’s Pumpkins are both taped in the back to the Crunch bars but you can’t see that from the front.
From the front it just looks like I’m on top of my game.

The hardest part of making these buckets is keeping them hidden from my kids for the next couple of days.

8 Oct

This would be a great craft for a party or to put in a lunchbox as a special treat.

And of course, it’s really easy too.

All you need is some scrapbook paper, a little tape, and a few cute stickers to spookify the front of your juice boxes.

To make these wrapped juice boxes, first remove the straws from the back of each box and set aside. You’ll obviously need these later.

Then cut strips of scrapbook paper that are as wide as the boxes are tall and long enough to wrap completely around the box.

Once all of your strips are cut out, wrap each box and secure with tape. I use double-sided tape so that I can secure each one from the inside flap of paper and the tape doesn’t show.

Then just attach your stickers to the front.

See, easy!

If you want to cover the tops, just cut a small strip of paper that will lay over the top of each box and tuck the sides down into the other paper.


Superhero Party!

20 Sep

I love to throw a party.

Birthdays, Christmas, Halloween, Groundhog Day, I don’t care. Any day is a good excuse for a celebration in my book!

Last year, I helped my pal Sara put together a superhero themed birthday party for her son, Ethan.

The party had to be done on a budget, in a couple of weeks, and would be held in a small space with just a few friends.

So I put my party planner hat on and got to work!

My husband likes to say that as long as I have enough scrapbook paper and scotch tape – I can throw anyone a party. He’s mostly right.

I was able to find pretty much everything we needed for this party at the dollar store and my favorite craft store. I used coupons whenever I could to help keep my out-of-pocket expenses down.

Here’s how it all came together:

One of the things I always do when I throw any party, is to look around my house to see what I already have that I can use. For these cool Spiderman cupcake toppers, I actually used one of my son’s old graphic novels. He was going to donate it anyway so it worked out perfectly.

I carefully cut out the cells that I thought were cool and pasted them onto some card stock. Once the sheet of card stock was full and the glue was dry, I cut around the cell again. The card stock just makes each topper more sturdy. I used a small piece of scotch tape to attach toothpicks to the back of each one.

To make these reusable, you could laminate them or use clear packing tape like I often do. Put a piece of tape across the front of the topper, then flip it over a put a piece across the back. Trim with scissors to fit and voila! You can use them over and over.

Sara was able to give me a few old comic books to use to make party decor from which was great because it saved us a lot of money.

For Ethan’s super banner, I cut triangles out of comic book pages (using a ruler to make sure they were all exactly the same), then I glued them all to a ribbon and let dry. The letters came from a pack of die cut letters and numbers I found at the dollar store.

Once I figured out how to make treat cones, I was hooked! I’ve used them for every party since Ethan’s. They’re great for kids because you can fill them with so many things. The kids can just grab one and eat on the go. How often do kids sit still at a birthday party? Exactly. These cones are good to go!

The trick is figuring out how to make them stand up. There are all kinds of tutorials for this online but here’s what I did:

First, Sara and I went to the craft store together and chose scrapbook paper that would match Ethan’s party theme.

I used an inexpensive white basket that I already had lying around. I printed some comic book covers that I found online and glued them onto a strip of yellow construction paper for a pop of color. Then I used double-sided tape to attach it to the basket.

To make the paper cones, I laid a dinner plate on the back of each sheet of paper and traced around lightly with a pencil. Then I cut it out, folded it over into a cone shape (leaving a small opening at the bottom) and taped the seam on the back down.

To get them to stand up you can certainly buy styrofoam from the craft store but I’m way too cheap for that so I used the lid from an old styrofoam cooler. I washed it really well and cut it to fit the basket. Then I inserted small wooden dowels down into the styrofoam and slid each cone on top.

I ran a sheet of red, blue, and yellow construction paper through my shredder to make confetti and then filled the basket so you wouldn’t see the styrofoam.

I found the cute “Boom”, “Pow”, and “Zap” decorations online, printed them, cut them out, and attached the small ones to toothpicks and the large one to a wooden dowel. Then I just slid them into the styrofoam.

One way that Sara was able to save money on this party was by keeping the food simple. She made a few sandwiches and then cut them into easy to eat strips. Then she wrapped strips of comic book pages around each one.

Instant cuteness!

I feel like I should just take a sec to mention here that I’m not really sure how safe it is to put old comic book pages right up against food like that but the important thing is that all of the kids who ate them survived. I wouldn’t suggest doing it every day but once for a birthday party should be fine.

For the goodie bags, I bought a pack of yellow paper bags at the craft store using a 40% off coupon. Then we just attached strips of scrapbook paper and cute “Pow!” printable graphics.

Our craft store has a dollar section that just happened to have superhero stuff at the time! So for about $3 we were able to get coloring pages, pencils, erasers, and a little toy for each bag.

For the Superhero snack bar, I used printables yet again. Gotta love free printables! We just printed, cut, glued toothpicks onto the back, and they were done.

I realized at the last-minute that we didn’t have anything to put the “PICK YOUR SUPERHERO” sign in so I fashioned one out of a yogurt cup, some construction paper, and scrapbook paper scraps.

I’m telling you, I can make party decor out of anything.

For a sweet treat that matched the theme, I found some really cute free printables online that I forwarded to Sara so she could print them out and then do all that super fun cutting!

Actually, her eyes are better than mine and those superhero masks are tiny, so this task fell onto her shoulders.

Once cut, the masks are attached to the lollipops with tape and a hole punch is used to punch a hole in the cape for the stick to slide through.

Then she wrapped a box that she already had with tissue paper and decorated it with a strip of scrapbook paper. I made a little sign for the back out of scrapbook paper and all that was left to do was insert the lollipops!

This is yet another quickie decor project for a spot that just needed a little something.

Ethan is always doing superhero or ninja poses and I happened to snap a picture of him doing a ninja move one day. So I printed it out, trimmed it up, and made him a cape and a mask out of construction paper. Instant superhero!

I attached it to a wooden dowel with tape and slid it into a mason jar that I filled with some of that construction paper confetti that I told you about previously. A free printable, a die cut number from the dollar store, and a strip of scrapbook paper were all it took to complete this project.

This was a background that I made so that we could put the kids in front and take cute pics.

To make this background I cut a cityscape out of black poster paper and attached yellow squares and rectangles (which were cut out of yellow poster paper) to make windows. I also made a search light with an E in it. Had to have that.

I glued the cityscape onto some blue poster paper and attached another little Super Ethan.

We put comic book pages around the outside to finish it up.

There is not a single picture from that party where all of the kids are looking the same direction or not goofing off but that just made for some really funny pictures.

Every superhero should have a cape so I made Ethan his very own out of some felt from the craft store. This project was really easy and inexpensive.

I found a cape tutorial online. It was just a matter of drawing an outline with chalk, cutting, and gluing.

He loved his cape and everyone took turns wearing it. It was a big hit with all the Dads too.

So that was Ethan’s birthday party. It wasn’t expensive or time-consuming but he loved it – which is the most important thing.

All of the printables and tutorials I used can be found online. Just search “free superhero party printables” and tons of ideas will come up for you.

To get you started, I made a few printables for you. Just click on them to save them to your computer. Then you can resize them if you need to and use them however you want to. Print them out on card stock so they’ll be extra durable.

Superhero Collage

Super power food table labels

Because I can’t leave anything alone…

16 Aug

Camryn had a very short school supply list this year.

I was shocked.

Included in that list was a 1/2 inch binder.

So off to Target I went in search of a cute new binder but was soon sorely disappointed to find only four in the whole store, and they were all white.

Boring.

They had so many cute 1 inch binders that I was tempted to grab instead but I didn’t want my kid to be singled out for having the wrong sized binder.

Nobody needs that drama.

But nobody should have to live with a plain old boring white binder either. Not when they have a Mom with a huge stack of scrapbook paper at home and a free afternoon.

Back at home, I let her pick two sheets of scrapbook paper that she liked and cut each page to fit inside the plastic cover for her. Then we each chose a page to decorate.

She used two .99 sticker sheets to decorate her page because she has not yet learned moderation.

For my page, I just cut a purple piece of scrapbook paper into the shape of a heart and then stuck her initials on top (just to eliminate any possible confusion as to whose binder it was).

Once we were both done, we just slid our newly decorated scrapbook paper inside of the plastic covers.

Voila!


Can you tell which side each of us did?

She loves her spiffy new notebook now and we both enjoyed having craft time together.

Also, her school’s mascot is an owl so I’m pretty sure that we couldn’t have decorated it more perfectly.

So if you want to spruce up a plain old boring notebook, just slap some scrapbook paper on it.

If you just happen to have some stickers lying around, add those too!

It’s cheap, easy, and it makes a big difference.