Archive | Uncategorized RSS feed for this section

Caramel Almond Cookies

29 Oct

I burned my mouth on these cookies more than once. Not because I’m a slow learner but because I really really like caramel, and I’m impatient, and o.k. maybe because it’s possible that I might be a slow learner and also a bit of a glutton.

Moving on…

Hot caramel is no joke folks. I’m speaking from personal experience here. Let these cookies cool for a few minutes before you pop them in your mouth.

You may have noticed (if you’ve skipped ahead of all my rambling to the list of  ingredients) that these cookies are very similar to the other flourless cookies I’ve made before and you’d be right. This recipe uses the same basic ingredients with a slight twist.

My recipe calls for almond butter which is a cinch to make at home if you have a food processor. Just use 8 oz. of raw almonds to get about 1 cup of the finished product. Toast the almonds at 350 for 8-10 minutes. Then grind the almonds in your food processor for about 10 minutes until the oils are released. Yes, that is a long time to have to listen to your food processor chop nuts, but it really does take about that long for the nuts to release their oils so that you get nut butter and not nut dust.

Sprinkle in a pinch of salt and a little honey and/or cinnamon if you want, grind a bit more to combine & voila! Almond butter.

If your finished almond butter is still a little too dry for your taste, you can add a little vegetable oil & blend again until smooth.

Store your butter in an air tight container in the fridge.

Now that you’ve got almond butter, spread it on fruit, toast, biscuits, sandwiches, or do like I do & make cookies. Just don’t burn your mouth.

Ingredients

1 cup almond butter

1/2 cup granulated sugar

1/2 cup brown sugar

1 tsp vanilla or almond extract

1 tsp baking soda

1 egg

caramels – individually wrapped or chips

Directions

Preheat oven to 350 and line baking sheet with silpat, or parchment paper. Or spray with non stick spray.

Using your stand or hand mixer, blend almond butter and sugars until combined. Add, baking soda, egg and vanilla and mix again to combine.

There are three ways to add the caramel to your cookies. The first is to mix the caramel pieces into your dough so that the cookies are baked with caramel chips throughout. If you are using the individually wrapped square caramels, you’ll need to cut them into quarters if you want to use them this way. The second way is to add the caramel pieces to your cookies halfway through baking. The third way is to stuff the caramel in the middle of the cookie. I’ve included pics below to show you the difference.

Roll the cookies into small balls, flatten a bit & bake for about 10 minutes or until light golden brown.

Cookies will be soft right out of the oven. Let them sit for a couple of minutes on their baking sheet to firm up so you can move them to a cooling rack.

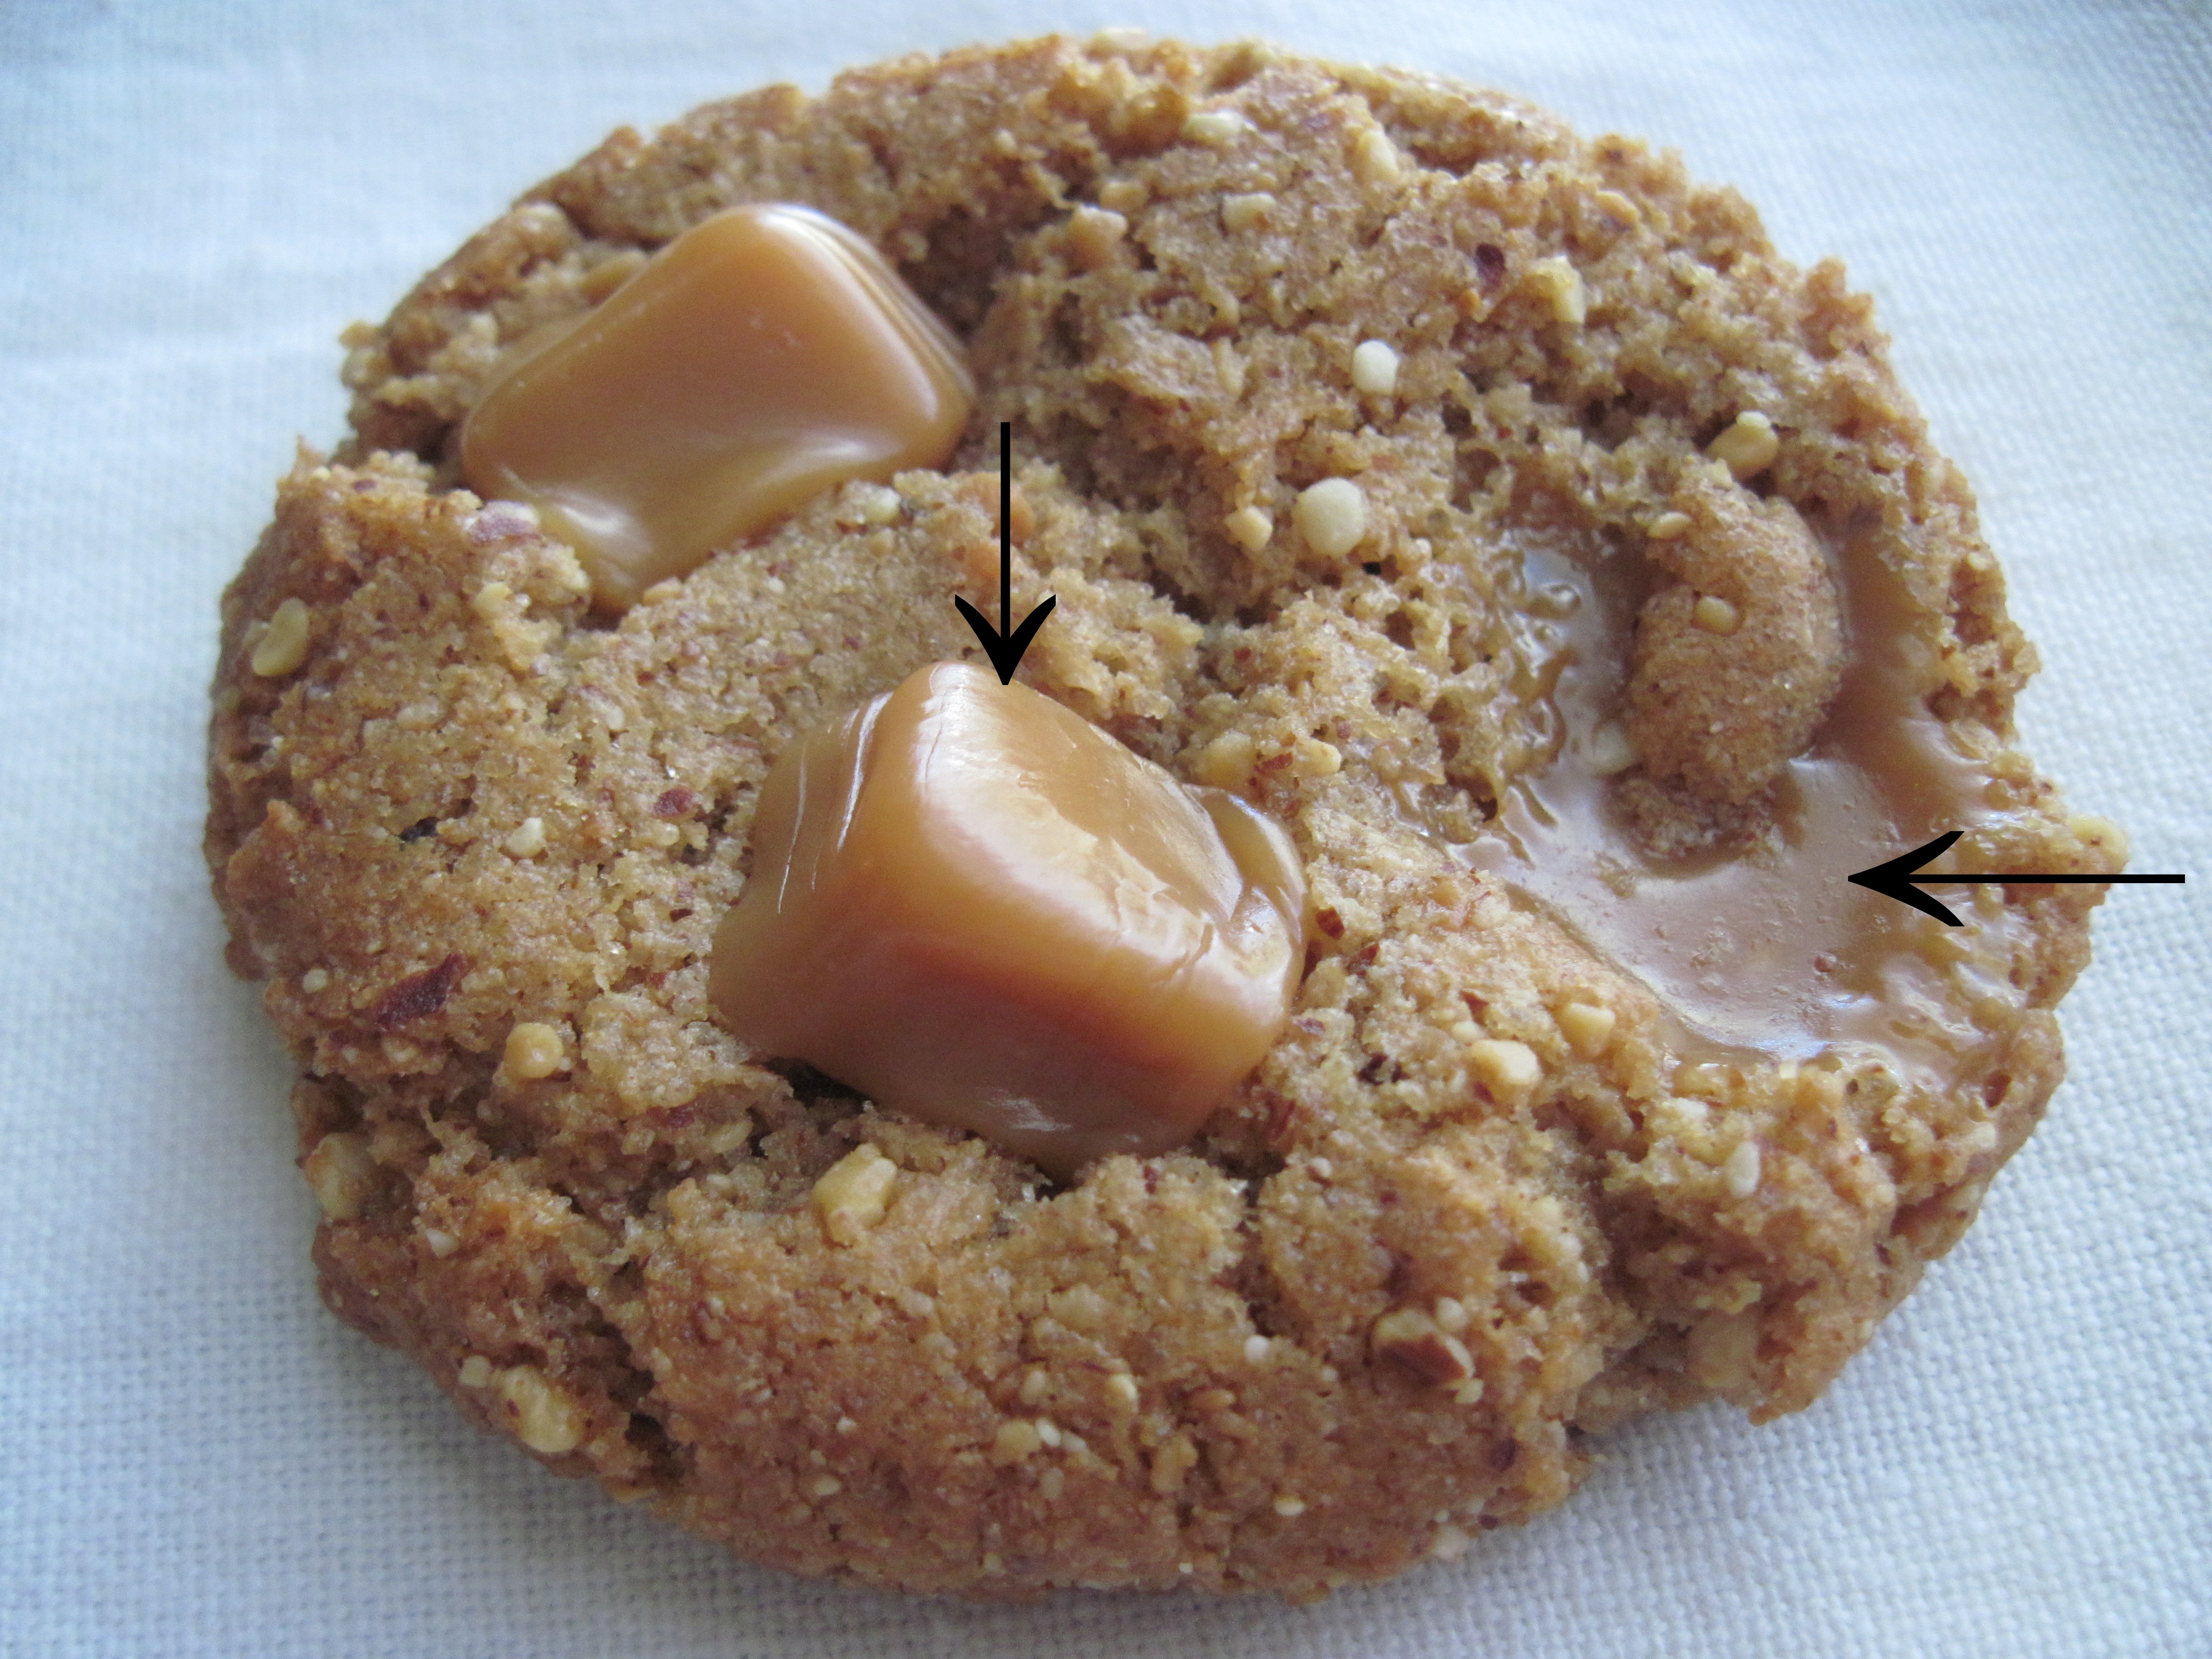
The caramels on the left were added halfway through baking. The melty pool of caramel on the right was achieved by mixing the chopped caramel pieces into the batter before baking.

Caramel stuffed in the middle.

So which method is best? Good question. The answer (as usual) comes down to personal preference. I prefer the caramels mixed into the dough before baking. Adding them before baking gives them time to melt slowly throughout the cookie so that you get gooey caramel and equal caramel/cookie ratio in every bite.


Hurried Curried Chicken Salad

17 Oct

From time to time, life hands us lemons. This cannot be avoided. It is a widely accepted fact that we are to make lemonade out of those aforementioned lemons. Obviously this is a metaphor for turning a bad situation into a good one & that’s just what I did. In a pinch, during crunch time, when I was down to the wire & things were at their bleakest, I managed to turn what could only be described as a hot mess, into a lovely & delicious dinner for two.

I had come across several versions of a recipe for a certain chicken dish whilst perusing the internets. This recipe appealed to me. It was cheap, supposedly easy to make, & didn’t require eleventy seven different ingredients, score!

I gathered the few ingredients & set off to wow my Husband & children with this sure-to-be delectable dinner. I followed the directions impeccably & waited as the chicken simmered & intriguing smells wafted through my kitchen. Forty five minutes later my anticipation had piqued & I could wait no longer. I had to sneak a taste. The next 15 seconds were filled with more regret than I care to describe but please know that it was plentiful & long-lasting.

Dinner time was fast approaching & I had nothing to show for it. Nothing to serve to my loved ones except an enamel covered cast iron pot full of hopelessness. The dish was bad, that was a fact, but it was more a matter of the sauce being grody than the actual chicken meat. So I started de-boning while scouring my brain & refrigerator for a back up plan & came up with a what I knew would be a surefire winner.

As I patted myself on the back for being so clever (you do that too right?) I soon realized that I was missing some of the required ingredients. So I subbed in a few things here & there & the end result was delicious.

The Dressing

3/4 cup mayonnaise
2 tsps lime juice
3/4 tsp curry powder

Mix all ingredients together & set aside.

The Goods

2-3 cups cooked chicken
1 medium apple, cut into small chunks
3/4 cup dried cranberries or cherries
1/2 cup thinly sliced raw sweet pepper
1/4 cup chopped walnuts
1/8 cup sunflower seeds

Mix the goods together & add dressing. Toss lightly until everything is coated. That’s it! Serve on bread as a sandwich or over a bed of greens. Or serve over a bed of greens on a sandwich. Enjoy!

Cass

Flourless Peanut Butter Chocolate Chip Cookies

17 Oct


Super Nut & Seed Cookies


My youngest is not a fan of peanut butter. Yes, you read that correctly. I’m still trying to get my head around it.

I was in a local health food store last week & came across “Super Nut & Seed Butter”. I checked the ingredients & noted that it was comprised of things my daughter likes. It was also all natural, organic & only $2.99. So I snatched it up & was on my way.

Upon further inspection back at home, I discovered that it was also salt free & sugar-free. Then I discovered that it was not spreadable – at all.

Dang.

So me being me, I figured, why not bake it into a cookie? Surely, if you slap a bunch of chocolate chips in it, it will work.

That’s been my baking philosophy for a while now & it hasn’t let me down yet. So when in doubt, throw some chocolate chips in.

Turns out, my wacky idea worked. The hubs said they were the best cookies ever. I should note that he has made this statement about just about every batch of cookies I’ve ever made. I think Alzheimer’s is setting in.

My Super Nut & Seed Butter was a mash-up of cashews, almonds, pumpkin seeds & flax seeds but feel free to use any nut butter you like. I’ve also made these cookies with plain old Skippy & they were fantastic.

Flourless PB Chocolate Chip Cookies
Inspired by The Gourmet Cookbook

Ingredients:

1 cup nut butter
1 cup brown sugar *
1 egg
1 tsp baking soda
chocolate chips and/or butterscotch chips

Directions

Preheat oven to 350.
Using your stand or hand mixer combine nut butter & sugar(s). Add egg & baking soda & mix to combine. Fold in chocolate and/or butterscotch chips. Roll into small balls & flatten with the bottom of a glass or your hand. You can also make the cross-hatchy pattern with your fork if you want to. I skip that step so the cookies will be in my mouth faster :). Bake for 8-10 minutes until lightly browned. Cookies will be soft when you take them out of the oven. Letting them sit on the sheet pan for a couple of minutes when they come out of the oven will help them to set up.

* I used a full cup of brown sugar because my cookies needed that smoky molasses flavor that only brown sugar brings to the table thanks to the blandness of the nut butter I was using. If you’re using regular peanut butter: use 1/2 cup granulated sugar & 1/2 cup brown sugar.

* No need to measure the chocolate/butterscotch chips. Just add a good handful or two. You can also fold in any chopped nuts & seeds you like.


Coconut Bundt Cake

7 Oct

coconut cake


Over the course of my life, I’ve learned that there are 2 distinct camps; Those who love coconut & those who do not.

There seems to be no middle ground here. It’s a love/hate situation.

I fall into the “hate” camp. To be clear, we’re talking straight up coconut, not coconut flavor – that’s different. This is a textural thing folks. I happen to like coconut flavor (hello piña coladas) but the act of chewing on coconut makes me cringe.

This lifelong distaste for coconut has made me an outsider amongst family & friends, the black sheep, if you’d like to take it that far (I do). I’m always the one sitting dessert-less when the coconut cake is passed around.

Yet this widely known fact amongst my family members does not keep them from requesting coconut cakes for birthdays & holidays. And I can’t say that I blame them. For all my hatred of coconut, I make a fabulous coconut cake.

Ironic, don’t ya think?

Rewind to just a few weeks ago, my precious Grandfather was turning 91. Everyone knows about his love of coconut cake so that’s what I set out to make. Only, after careful consideration of his awesomeness & the fact that I can never just leave things alone, I decided to make him a jazzed up version of his favorite cake.

The end result (I hear) was fantastic. I wouldn’t know because I did not try it.

This recipe is a basic sour cream cake, jazzed up with coconut, lime zest, & crushed mandarin oranges. This cake would be great with the addition of a little rum or bourbon, just as most things in life are. Enjoy!

For The Cake

2 sticks unsalted butter, room temperature
1 1/2 cups granulated sugar
2 tsps vanilla
2 eggs
2 cups all-purpose flour
1 teaspoon baking powder
1 teaspoon baking soda
1/8 tsp salt
1 cup sour cream
1/2 cup sweetened flaked coconut
1 tbsp lime zest
1/4 cup chopped mandarin oranges or crushed pineapple

For The Vanilla Lime Glaze

1 cup confectioners’ sugar
4-5 tbsps heavy cream
½ tsp vanilla extract
zest of 1 lime

To Make The Cake:

Preheat oven to 350 degrees & spray pan with non-stick spray.

Cream butter until smooth using either a stand or hand mixer.

Add sugar to butter & mix until lighter in color & fluffy. About 3 minutes. Add vanilla.

Add eggs 1 at a time. Mix well after each addition.

In a second bowl, combine flour, baking powder, baking soda & salt.

Add four mixture to butter/sugar mixture alternating with sour cream. Mix until combined.

Fold in coconut, lime zest & mandarin oranges (or crushed pineapple).

Spoon into bundt pan, level top with the back of a spoon & bake for 50-60 minutes or until done.

Allow cake to cool before inverting from pan.

To Make The Glaze:

Mix together all ingredients until smooth. Spoon over cooled cake. If glaze is too thick, just add cream a tsp at a time until it reaches your desired consistency. Don’t forget the sprinkles!


Gooey Butterscotch Bars

5 Oct

Because I had two bags of butterscotch chips in my pantry for the last 2 weeks that I had no idea what to do with.

Because after a tough day of fancy book-learnin’ at school, who wants to come home to a plate of raisins?

Because my Husband loves butterscotch but pronounces it “bettascaaatch” because he knows it will make me laugh every time.

Because I ran errands all morning & then came home to play freezer jenga for a while until a box of ice cream sandwiches fell on my foot when I could have been drinking root beer & watching re-runs of Roseanne.

Because I’m not on a diet but if I were – today feels like a good day to wreck it.

And lastly because these have oats & an egg in them so they’re basically breakfast.

For all those reasons…

gooey butterscotch bars

Ingredients

  • 2 1/2 sticks butter, room temp
  • 3/4 cup packed brown sugar
  • 1/2 cup granulated sugar
  • 1 large egg
  • 1 teaspoon vanilla
  • 1 1/2 cups all-purpose flour
  • 1 teaspoon baking soda
  • 1/2 teaspoon salt
  • 1 2/3 cups quick-cooking oats
  • 1 3/4 cups (11.5-oz. pkg.) butterscotch chips, divided.

Directions

Preheat oven to 375°

Using your stand or hand mixer, beat butter, brown sugar and granulated sugar in large bowl until creamy. Add egg and vanilla extract, beat well. Add flour, baking soda and salt. Beat on low speed just until blended. Stir in oats and 1 cup butterscotch chips. Spread dough evenly onto bottom of ungreased 13 x 9-inch baking pan.

Bake for 25 to 30 minutes or until light golden brown. Remove from oven & sprinkle remaining butterscotch chips evenly over hot cookie in pan. Let stand 2 to 3 minutes. Spread chips evenly with spatula. Cool completely. Cut into bars. Store tightly covered at room temperature. Enjoy!

* I also added chocolate chips to the top of my bars.

Cass

I Knew I Bought All Those Biscuits For A Reason

1 Oct

Currently, you can get a great deal on canned biscuits at Publix by combining the following coupons:

Pillsbury Grands! Biscuits, 12 to 17.3 oz, 4/$5
-$1/3 Pillsbury Refrigerated Grands or Grands Jr. Biscuits
-$2/3 Pillsbury Refrigerated Dough Items 9/16/2012, coupon sheet or Printable Publix Coupon

Buy 3 & pay $0.75 for all three cans! Not a bad deal in my book.

I was stalking glancing over one of my favorite food blogs the other day & came across this recipe. My mind immediately went to all that biscuit dough squished into cans on the top shelf of my fridge & I prepared to get to work. 

I didn’t have pre-made cinnamon butter but that was no biggie. As I was collecting the butter, cinnamon & sugar, I started thinking about what else I could stuff into these biscuits to make them fabulous. Nutella? Yep. Chocolate chips, why not? I always have those. Why not make a savory version? Good Idea. Then I patted myself on the back for being so clever. You do that too right?

In the end, I made 3 variations of these pull-apart biscuit/roll thingies. All 3 were easy to make, tasted delicious & I would imagine that you could pretty much stuff these suckers with whatever tickled your fancy that day & they’d still be great.

There is no measurement for most of the ingredients that I used. But it’s super simple. Promise. Here’s how I made ’em…

Cinnamon Sugar Rolls inspired by bakedbree.com

  • 1 can Pillsbury Grands Biscuits
  • butter
  • brown sugar
  • cinnamon sugar mixture – 1 tbsp granulated sugar + 1 tsp cinnamon

Directions

Preheat oven to 350

Roll out biscuits slightly with a rolling-pin, wine bottle, sauce jar, whatever you have on hand. They don’t need to be completely flat, just flat enough that you can roll them up.

Spread a little butter all over the top of the biscuit.

Sprinkle some brown sugar on top of the butter followed by some of the cinnamon sugar mixture.

Roll up the biscuit & lay it seam side down.

Slice biscuit into thirds & place those three pieces into a muffin pan that has been sprayed with non-stick spray.

Bake for 14-17 minutes

For Glaze: Whisk together 1/2 cup of powdered sugar & 2-3 tbsps of water or milk. Drizzle over the rolls.

Chocolate Rolls

  • 1 can Pillsbury Grands Biscuits
  • Nutella
  • chocolate chips (I used semi sweet)

Directions

Roll out biscuits slightly.

Spread a layer of Nutella on top & sprinkle on some chocolate chips.

Roll up biscuit, slice into thirds, put each third into a muffin pan sprayed with non-stick spray.

Bake at 350 for 14-17 minutes

Savory Pull Apart Dinner Rolls

  • 1 can Pillsbury Grands Biscuits
  • butter
  • Italian seasoning
  • minced garlic (I used the pre-minced stuff in the jar)

Directions

Roll out biscuits slightly.

Spread a layer of butter on top.

Sprinkle garlic & Italian seasoning over the butter.

Roll up, slice into thirds, place all three pieces in a muffin pan sprayed with non-stick spray.

Bake at 350 for 14-17 minutes

This is what your biscuit should look like just before you roll it up.

Ready for the oven.

Cinnamon & Chocolate Rolls

Savory Dinner Rolls

Cass

Meat & Potatoes Pizza

29 Sep

meat & potatoes pizza


What is it about Friday nights & pizza? I mean, sure you could have pizza on any other day of the week & it would taste just as good, but there’s just something about pizza on Friday. I feel the same way about a big pot roast. That just screams Sunday to me.

In celebration of “Pizza Friday” at our house, I decided to do things a little differently. I played it safe with the kids though. Heavy on the cheese, light on the sauce. They’re not exactly risk takers when it comes to food.

The parentals’ pizza was much more fancy & mature.

I keeps it classy.

I had been wanting to try potato pizza ever since I had seen it done on one of those Food Network specials.

I like potatoes. I like pizza.

Seemed like a no-brainer to me.

There are tons of recipes online for potato pizza & all of them were pretty much the same. So I scoured my fridge for some culinary inspiration & threw my version together in just a few minutes.

It was easy. It was fast. It was delicious. It was cheaper than calling for delivery.

Works for me.

Meat & Potatoes Pizza

extra virgin olive oil

1 yellow onion – thinly sliced

1 russet potato – thinly sliced

1 lb refrigerated pizza dough

1/2 cup cooked meatballs – sliced or quartered

1/2 cup of red wine (give or take) – I used Merlot

Italian seasoning – optional

shredded mozzarella/parmesan cheese blend

Directions

Preheat oven to 450

Saute onion in a little olive oil over medium heat until soft.

Add a splash of wine. I did not measure here but I would venture to guess that I added about 1/2 cup to my onions.

When your onions are good & drunk with purpley goodness, transfer them to a bowl with the potatoes & meatballs.

Drizzle in just enough olive oil to lightly coat everything. Season with salt, pepper & Italian seasoning. Toss gently to combine.

Press or roll out your dough to desired shape & place dough on a cookie sheet or pizza stone.

Add potatoes to the dough in one layer. Then arrange meatballs & onions on top. Sprinkle lightly with cheese blend.

Bake for about 18 minutes or until crust is golden & potatoes are cooked through.


* I actually cooked my pizza on the back of the cast iron skillet that I cooked my onions in. I just wiped it out, flipped it over, rubbed some olive oil on with a paper towel & I was good to go.

Wine Cupcakes!

27 Sep


We’re talking about wine, cupcakes, and friendship today!

All good things.

We’re discussing these things because today happens to be my best friend’s birthday.

We’ve been friends for over 20 years! That’s a long time.

That deserves a blog post.

Being friends as long as we have, there are a lot of great memories that we share.

We rarely talk on the phone but when we do, we usually end up laughing hysterically for hours over the things we did before we knew any better. In other words, our 20’s.

One particularly hilarious memory for me, revolves around a couple of bottles of red wine & how we learned late one night the best way NOT to open them. Word to the wise – corkscrews have a purpose. Keep ’em on hand… just sayin’.

In honor of her special day, I’m posting a recipe that reminds me of her.

These cupcakes are definitely for grown ups. There is wine in the cake & wine in the frosting, I also highly recommend serving them with a glass of wine.

Especially if it’s your birthday. 

Happy Birthday Jill!


Sweet Red Cupcakes

For Cupcakes

1 1/2 cups all purpose flour

1 tsp baking powder

1/2 tsp salt

1 cup granulated sugar

1 stick butter – room temperature

2 large eggs

1/4 sweet red wine

1/4 cup milk


For Frosting

8 oz. cream cheese – room temperature

2 tbsp sweet red wine

16 oz. package confectioner’s sugar

1 tsp vanilla

red food coloring  – if desired


Directions

Preheat oven to 350 degrees.

Whisk together flour, baking powder and salt. Set aside.

In a separate bowl using your stand or hand mixer, beat sugar and butter until light and fluffy. About 2-3 minutes.

Add eggs, one at a time, and mix until completely incorporated.

Add wine & milk & mix until combined.

Add dry ingredients & mix until smooth.

Fill cupcake tins about 2/3 full & bake for approximately 15 minutes or until toothpick comes out clean.

Cool for a few minutes before removing from pan.


For Frosting

Beat cream cheese and wine with stand or hand mixer until smooth. About 2-3 minutes. Gradually add in confectioner’s sugar and vanilla until well blended. Frosting will be pale pink. Add a couple drops of red food coloring if you want a deeper colored frosting. Frost cupcake tops.

Notes:

*Yields 24 cupcakes


Kind of Healthy, Definitely Yummy Snack Bars

27 Sep

Yes. Another variation on an oatmeal snack bar. Sure there are already hundreds of recipes in existence for oatmeal bars but this one is different.

Promise.

Why?

Because this stuff is in it…


Peanut butter, raisins, peanuts & granola – in 1 jar. Say whaaaa? I know. Sure, I could have spread it on some toast or made a fancy pb&j but where’s the fun in that? I say, let’s grab a jar of this crazy stuff, mash up a banana & bust out the chocolate chips! But if toast is more your speed, that’s cool too.

It’s only fair that I mention that these are somewhat healthy. Not as healthy as say… a carrot. But probably better for you than a brownie.


Peanut Butter Banana Oatmeal Snack Bars

1 cup whole wheat flour (or all purpose flour)

1 cup old fashioned oats

1 teaspoon baking soda

1/4 teaspoon salt

1/2 cup brown sugar

1 mashed banana

3/4 cups any flavor Planters Nutrition peanut butter (or regular peanut butter)

1 tbsp vanilla extract

1/2 cup milk (or almond milk)

1/3 cup chocolate chips (semi sweet, milk chocolate, or mix of both)

1 tbsp flax seeds


Directions

Using your hand or stand mixer, cream the peanut butter & sugar together for about 2 minutes or until well incorporated.

Add vanilla & banana. Mix to combine.

Add flour, oats, salt, baking soda & mix to combine. Once everything is incorporated, add milk.

Fold in chocolate chips, flax seeds, or any other mix-ins.

Press into an 8×8 pan & bake at 350 degrees for about 20 minutes or until set.

Notes

* I added flax seeds because my daughter loves them. But if you’re not a fan, leave ’em out.


Good Morning, Muffins!

23 Sep

Good Morning, Muffins


I’m no vegan, not by a long stretch. But every once in a while, either out of necessity or sheer curiosity, I find myself searching the web for vegan recipes. More often than not, it’s because I’ve run out of eggs or butter or something else that originated from an animal. But rather than dash all hopes of chocolate cake or other yummy treats, I improvise. I’m no quitter.

These muffins are perfect for breakfast. They taste good and they’re good for you. If the whole soy milk thing turns you off, just use the same amount of your favorite milk instead. No biggie. Don’t want applesauce in your muffins? That’s cool too. Just add melted (but cooled) butter instead. They won’t be vegan but who will know?

Banana Oatmeal Muffins

1 1/4 cups flour
1 cup quick cooking oatmeal
1/2 cup brown sugar, pack it down
1 tbsp baking powder
1/4 tsp baking soda
2-3 ripe bananas, mashed
1/2 cup almond milk – or cow’s milk for non vegan (any milk works here)
1/2 cup applesauce or 1/3 cup melted & cooled butter for non-vegan
1 tsp vanilla

Preheat your oven to 400 degrees. Spray your muffin tin with non-stick spray or bust out your liners.

In a big bowl, combine all your dry ingredients; flour, oatmeal, brown sugar, baking powder and baking soda.

In another bowl, whisk together your wet ingredients; mashed bananas, milk, applesauce (or butter) & vanilla.

Now add your wet mixture into your dry mixture & stir a few times, just until the mixture comes together. Over-mixing does not result in nicely textured muffins.

Fill each muffin cup about 2/3 full with batter & bake for 20-25 minutes or until done. Mini-muffins will need 10-12 minutes.

* You can also add ⅓ cup of unsweetened cocoa powder and/or chocolate chips for chocolate banana muffins.

* I like to sprinkle the tops with brown sugar, oats, dried cranberries & flax seeds. Give the topping a little press before baking & you’re good to go.